The Value Set Authority Center (VSAC) uses an Alfresco© content management system for value set collaboration, communication, workflow and document management by value set authors, stewards, and their invited external collaborators. Value set authors and stewards can post value sets from the VSAC Authoring Tool into VSAC Collaboration to be viewed, discussed, or voted by collaboration group members. The VSAC Collaboration Tool requires a UMLS License Agreement for each user. The Alfresco website provides documentation and useful video tutorials.
You can access the VSAC Collaboration Tool through the VSAC Authoring Tool, as well as
directly through the VSAC Collaboration Tool URL.
-
VSAC Authoring Tool: https://vsac.nlm.nih.gov/
(requires
pre-assigned
authoring
permissions)
- Within the Collaboration Management tab, select one of your Collaboration Site
URLs.
-
Within the Authoring tab, in the Collaboration menu on the left of the value
set's editing screen, select
Visit Site. If the Visit Site link is grey this means you have
not yet created a Collaboration Site for this
value set.
- VSAC Collaboration Tool: https://vsaccollab.nlm.nih.gov/
The VSAC Collaboration Tool provides two types of dashboards: Personal
Dashboard and
Site Dashboard.
Personal Dashboard
The VSAC Collaboration Tool creates a Personal Dashboard for each user. The Personal
Dashboard displays links to all of a user's value
set collaboration sites, activities, and discussions. Your first and last name serve as the
title of your Personal Dashboard. Use the
Home link on the top bar to return to your Personal Dashboard from any
other page to which you navigate.
Site Dashboard
The VSAC Collaboration Tool creates a Site Dashboard when a VSAC author creates a
collaboration site within the VSAC Authoring Tool.
VSAC authors may create a collaboration site for a single value set, as well as
collaboration sites for user-designated collections of
value sets. For each value set or group of value sets, the Site Dashboard displays
user-posted value set content and collaborator
discussions for that value set.
Once created, a collaboration site will appear under the My Sites dashlet
on the Personal Dashboard. New users of the
VSAC Collaboration Tool will not have any sites appear under their My Site dashlet until
they create a collaboration site within the
VSAC Authoring Tool.
There are three methods to create collaboration sites and post value set details to the
VSAC
Collaboration Tool:
Custom Method
The Custom method is useful when you need to gather several VSAC value sets into one
collaboration site. This Custom method is also
useful for a single value set collaboration site, when you need flexibility to add or
remove
value sets from your collaboration site in
the future.
-
From My Value Sets or Search All Value Sets in the VSAC Authoring Tool, you can
select one or several value sets and create a
collaboration site where you will subsequently post the value set details. You
can
use the table's sort (click on column headers)
and filter (type text into search boxes at the top of each column) functions.
You
can also use your pre-assigned and
steward-specific Keywords
to find the
value sets you need for your collaboration site. Here, we show you how you can
create a collaboration site by selecting multiple
value sets in your My Value Sets list:
-
The Site Creation dialog box prompts you to choose your Collaboration Site
Managers
from one or more of your VSAC Steward and/or
Author Groups to which you belong, and it prompts you to create a Collaboration
Site
Name for your new collaboration site. In the
screen shot example below, we named our example collaboration site "Cardiac Care
Medications," and this collaboration site will host
the example value sets we checked off in Figure 4 (Dipyridamole and Nifedipine).
Within the VSAC Collaboration Tool, site managers
are able to invite additional collaborators who have UMLS Licenses. Site
managers
can change roles of any site members.
-
Once you create your new collaboration site, you may post value set details to
this
collaboration site. Your new collaboration site
will be essentially an empty shell until you post your selected value set
details.
Here is how to do that:
In the Collaboration Management tab, select the checkbox next to your desired
Collaboration Site Name, and then select the
Post Value Set Details to Collab Site link.
-
When you click Post Value Set Details to Collab Site, you will
receive the following dialog box shown in Figure 7.
Here, you can choose the
Expansion
Profile with which you would
like your value sets expanded when you send them to your collaboration site. The
default selection is "Most Recent Code System
Versions in VSAC." You can check the “Apply CMS eCQM QA Rules†that contain
CMS-defined quality assurance checks for value sets
to be published within the eCQM programs.†You can also post a message to your
collaborators in the Post Message textbox. Your
message will appear in your collaboration Site Blog dashlet. You can select
draft
and published value sets when you Post Value Set
Details to Collab Site. This action will not publish draft value sets into the
public VSAC repository, and no external
implementation should ever use a draft value set.
VSAC Method
The VSAC method of collaboration site creation is useful when you need to create a
collaboration site for only a single value set and
you would like to have the convenience to create your collaboration site from within the
value set editing screen of the VSAC Authoring
Tool. The VSAC method can be limiting for you, however, because you cannot add more
value
sets to a collaboration site that you create
using the VSAC method.
-
Create Collaboration Site:
In the VSAC Authoring Tool, create and save a value set. The Collaboration tab
appears in the orange tool bar to the left of the
Harmonization and Report menus. On the Collaboration pull down menu, select
Create Site.
-
Post your value set to your newly created Collaboration Site:
On the Collaboration pull down menu, select Post Value Set
Details.
Here, you can choose the Expansion Profile with
which you would like your value sets expanded when you send them to your
collaboration site. The default selection is "Most Recent
Code System Versions in VSAC. You can check the “Apply CMS eCQM QA Rulesâ€
that
contain CMS-defined quality assurance checks for
value sets to be published within the eCQM programs. You can also post a message
in
the Post Message textbox, to your collaborators,
so they are alerted to your posting and understand your reason for posting. Your
message will appear on your collaboration site Blog
dashlet. You can select draft and/or published value sets when you Post Value
Set
Details to Collab Site. This action will not
publish draft value sets into the public VSAC repository, and no external
implementation should ever use a draft value set.
-
Visit your Collaboration Site:
On the Collaboration pull down menu, select Visit Site.
Alternatively, you can navigate to your VSAC-method created collaboration site
through the Collaboration Management tab.
HQMF Method
The HQMF method is useful when you have used a tool like the Measure Authoring Tool that
produces an HQMF (.xml) file in which you have included VSAC value sets as data
elements.
The goal is to create a collaboration site
that will contain all of the value sets for your measure, so that you and your
collaborator(s) can discuss and share information about
those value sets within the context of your measure. When you create a collaboration
site
based on an HQMF file, VSAC will read the list
of value sets object identifiers (OIDs) that you included in your HQMF file, and VSAC
creates a collaboration site with a holding place
for each of those listed value sets in your measure. When you post value set details to
your
HQMF-method collaboration site, VSAC pushes
to the collaboration site the value set details of every value set listed in your HQMF
file.
Here, we show how you can create a
collaboration site using this HQMF method. You will first need to download your desired
HQMF
xml file from the Measure Authoring Tool,
or from another tool that produces HQMF xml.
-
In the Collaboration Management tab, click the Create HQMF Based Collab
Site button.
-
Browse your local computer files to select your desired HQMF file that you have
already downloaded from a measure authoring tool
that produces HQMF files.
-
Import your desired local HQMF file.
-
The Collaboration Site Details dialog will show you the measure information that
VSAC extracted from your HQMF file. VSAC assigns
the measure name as the Collaboration Site Name. You need to choose which of
your
steward groups you want for the Collaboration Site
Manager. You can also add or delete member value sets from your collaboration
site.
This delete action does not remove your selected
value sets from the actual measure or from VSAC, only from the collaboration
site if
you choose to do so. When you are satisfied
with your changes, choose the [Save] button to finalize
creation of
your HQMF based collaboration site. If you make
any changes to your actual measure (in the Measure Authoring Tool, for example),
you
will want to download the updated measure's
HQMF file to your computer and then choose Import HQMF to load the updated HQMF
file
to your collaboration site.
-
Once you create your new HQMF based collaboration site, you may post your value
set
to the collaboration site. Your new
collaboration site will be essentially an empty shell until you post your
selected
value set details. Here is how to do that. When
you click the [Save] button in the previous Collaboration Site
Details dialog, the dialog window shows the active
Collaboration Site URL, and it provides a button at the bottom to Post
Value
Set Details to Collab Site. There are
several other ways to post your value set details to your collaboration site,
and we
will explore those options in a later section:
Schedule Automatic Expansions of Value Sets into VSAC Collaboration.
-
To edit the details (visibility and permissions, name, or description) of a
collaboration site, visit a VSAC Collaboration site for
a value set that you created in VSAC Authoring.
-
Notice a gear symbol in the top right corner of the Site Dashboard for your
value
set
site.
-
Click the gear, revealing a pull down menu.
-
Choose Edit Site Details.
-
Observe the Edit Site Details dialog window:
-
Here, you can change your collaboration site Name and
Description. If you change the site Name and
Description in the Edit Site Details window, the changes will not be
reflected
in
VSAC Authoring. These labels are specific to VSAC
Collaboration only.
We encourage you to edit the site Name and Description for sites created
using
the
Custom method or HQMF method. However, we do not
recommend you edit the Name and Description of collaboration sites created
using
the
VSAC method because the site Name defaults to
your value set name in VSAC, and the Description defaults to the value set
OID
in
VSAC.
-
Observe the Visibility options. There are 3 levels of
visibility
available for collaboration sites:
Public, Public with Moderated site membership,
and
Private.
-
We have set the default visibility for all VSAC Collaboration sites to
be
Public, which means the site is
searchable for users external to your group, and external users can view
your
content and contribute to discussion topics.
-
Public with Moderated site membership, which means the
site
is
searchable for users external to your group, but
you have control over who your site members are. You may add additional
members
to join your site, and external users can ask to
join your site, but this requires your approval. Users who are external
to
your
group will be able to find your collaboration
site, but the site will display only the site name and a blank page with
all
content hidden.
-
Private level of visibility renders your collaboration
site
undiscoverable and unsearchable to anyone who is not
a member of your group. Only your authors, stewards, and invited
collaborators
will have access to your collaboration site.
1. Add other people to be members of a VSAC Collaboration site for a value set
that
you
created in VSAC Authoring.
2. To add other people to a VSAC Colloboration site, you will need the
'managers'
user role
for the site. In the top right corner of the
Site Dashboard, click the person-shaped icon next to the [More]
button.
This will take you directly to the menu where
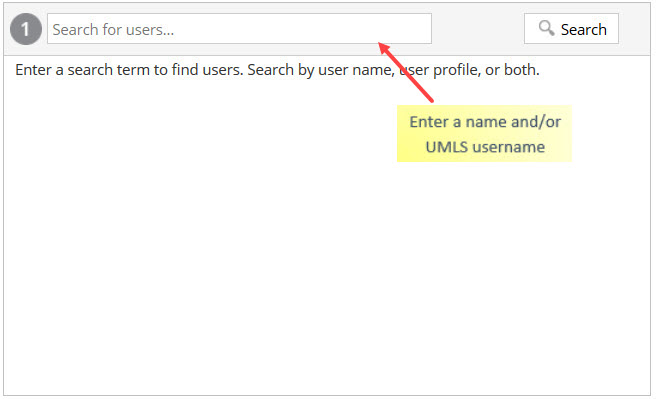
you can search for people to add to your site. Enter the name and/or UMLS
username
of
someone you would like to add to your site as a
collaborator. Only registered UMLS users can be added to your site. Non-UMLS
licensed users
who would like to join a VSAC Collaboration
Site may request a UMLS license here.
You may also
access the search menu by clicking on the [More] button, and then select Site
Members.
3. After you select the user’s name, choose the new member's Role
for
the content site. You will need to select a
Role for each member you would like to add to the site. You may also assign the
same
Role to
all members in a single step by selecting
the [Set All Roles to] button and then selecting the desired
Role.
After
you have selected all of the members you wish
to add to your site, and have assigned a Role to each of them, click the
[Add
Users] button.
Site Member Roles and Permissions:
-
Managers have full rights to all site content - what
they
have
created themselves and what other site members have
created.
-
Collaborators have full rights to the site content that
they own;
they have rights to edit but not delete content
created by other site members.
-
Contributors have full rights to the site content that
they
own;
they cannot edit or delete content created by
other site members.
-
Consumers have view-only rights in a site; they cannot
create their
own content.
For more information, see the
Alfresco
Documentation: User roles and permissions.
From within the VSAC Authoring Tool, access the Collaboration Content Site
for a specific
value set.
-
Log in to VSAC Authoring.
-
There are two ways to access a value set's content within a
collaboration site:
2.1 Accessing value set content through Collaboration Management tab:
-
Click on Collaboration Management tab.
-
Choose the collaboration site that contains the value set
you want by
clicking the hyperlinked
Collaboration Site URL. This will navigate
you directly to
the Site Dashboard of the selected collaboration
site within VSAC Collaboration.
2.2 Accessing value set content through Authoring tab:
-
Click the Authoring tab.
-
Choose your value set from My Value Sets by
clicking the
hyperlinked OID.
-
In the orange menu bar, click Collaboration
and then select
Visit Site from the drop-down
menu. This will navigate you directly to the Site Dashboard
of the selected
collaboration site within VSAC Collaboration.
-
In the Value Set Site Content dashlet, click on the
hyperlinked file
name.
-
Use the [Next] and [Previous] buttons,
in the header
bar of the spreadsheet view, to view each tab
of the spreadsheet. Click the [+] and
[-] buttons to
adjust the viewing size.
From within your value set site in VSAC Collaboration, export a document
to your
local
environment.
-
View the Excel file by clicking on the hyperlinked file name in
the Value Set
Site
Content dashlet.
-
Click the [Download] button in the header bar of
the
spreadsheet
view.
It is purposefully not within the scope of VSAC Collaboration to permit
file uploads
from
your local environment to VSAC Collaboration.
All value set creation and edits must take place within
the VSAC
Authoring
Tool.
For more information, see the
Alfresco
Documentation: Downloading files.
The Discussion Threads dashlet provides a space where site members
can post
comments
and
reply to comments about value set content
contained on that collaboration site. Each VSAC collaboration site
automatically
contains
three default discussion topics: Value Set
Usage, Value Set Purpose, and Value Set Content.
Add a new comment or reply to a comment in a current topic in the
Discussion
Threads
dashlet:
-
In the Discussion Threads dashlet, click the title of the topic
under which
you
want to
comment.
-
To add a new comment, click the Reply icon
on the far
right
of the
topic's heading page. Type your comment in the
Add Reply area and then click the
[Create]
button
at the bottom of your reply.
-
To reply to a comment, click the Reply icon
found on the
far
right of
the comments heading page. Type your reply in
the Reply to area and then click the
[Create]
button
at the bottom of your reply.
For more information, see the
Alfresco
Documentation: The discussion forum.
Site members can create new discussion
topics
in
addition to
the default topics as needed. Site stewards
can also edit an existing topic's
title
or delete an existing topic,
including default topics.
Add a new topic in the Discussion Threads
dashlet:
-
Click the (+) New Topic link in the top of
the
Discussion
Threads
dashlet. Type a new title in the Title text box and
add any desired text or tags. Click [Save]
when
finished.
The new topic
will now appear in the Discussion Threads
dashlet.
Edit an existing topic's title:
-
Click on the topic title (e.g., Value Set Usage) in the
Discussion
Threads dashlet.
-
Click on the Edit link to the right of
the topic.
-
Remove the old topic title from the Title text box and
replace it with a
new
topic
title. Click the [Save] button
when finished.
Delete a current topic in the Discussion
Threads
dashlet:
-
Click on the topic title (e.g., Value Set Usage) in the
Discussion
Threads
dashlet.
Click the (X) Delete link to the
right of the topic, and then confirm [Yes]
or
[Cancel]
in the subsequent popup.
Please be aware that if you delete a topic you will lose
all of the
content located
within that topic thread. If you decide to
delete a topic please communicate this decision to your
fellow
collaborators prior
to removing the topic from the Discussion Threads
dashlet.
For more information, see the
Alfresco
Documentation: The discussion forum.
You can control whether or not you receive VSAC
Collaboration
notifications
by email. To
review or change your notification settings:
-
Click on your name in the top black bar of VSAC
Collaboration.
-
Select My Profile to access your
User
Profile
Page.
-
Select Notifications in the features
bar at the
top.
-
If you wish to receive VSAC Collaboration notifications
by email,
check
the
Email Notification Feed checkbox and
then
click the [OK] button. If you do not
wish to
receive
email
notifications you will want to make sure the Email
Notification Feed checkbox is not checked and then click
the [OK]
button.
You can also enable and disable the notifications for
specific sites. To
review or change
your notification settings for specific sites:
-
From the User Profile Page, select
Sites in the
features bar at the top.
-
A list of all your collaboration sites will be
displayed. You can
enable
or disable the
notifications for a specific site by clicking
on the [Enable Activity Feeds] or
[Disable
Activity
Feeds] button on the far right of the site.
For more information, see the
Alfresco
Documentation: Controlling your email notifications.
The VSAC Collaboration Tool has multiple features that
will help you
manage site content.
These features include the ability to easily
move
files and
folders
within the current
site,
rename
content,
tag content,
and
create
favorites.
Move Content
within a
Collaboration Site
The VSAC Collaboration Tool has a drag and drop
functionality that
allows you to easily move
content around the site Document Library.
Please note, when you move a folder, all of its contents
move with
it.
-
In the collaboration site Document Library, locate
the file or
folder you want to move.
Click on the thumbnail of the file or folder
and, without releasing the mouse button, drag the
content to its
new
location.
-
Release the mouse button to move the content.
Note: The target folder must be visible
before you
move
the content. The
new location can be found in the panel on the
right hand side of the Document Library.
For more information, see the
Alfresco
Documentation: Dragging and dropping content.
Rename
Content within
a
Collaboration Site
You can quickly and easily rename the content within a
collaboration
site.
- Find the file or folder you want to rename in the
site Document
Library.
-
Hover the cursor on the content name to display the
pencil
icon.
-
Click the pencil icon to enter edit mode. Change the
name of the
content and then click
the Save icon to the right of
the text field or hit [ENTER] on
your keyboard.
Click the
Cancel icon to exit editing mode
and keep
the current content name.
Note: Please do not change the filename
extension.
For more information, see the
Alfresco
Documentation: Renaming content.
Tag Content within a
Collaboration
Site
To make content easier to find you can create and manage
tags for
files
and folders in the
collaboration site document library. To add
or edit tags for files and folders:
-
Navigate to the collaboration site's document
library by
selecting
the Document
Library icon, located on the Site
Dashboard menu in the upper-right hand corner. Find
the content
(file or folder) you
want to tag.
-
Hover your cursor over the No Tags
label to
display
the pencil
tag icon. If the file already has a
tag, hover your cursor on the tag to display the
pencil tag
icon.
Click the pencil tag
icon.
-
-
Add a new tag: Type the tag
name in the
textbox and then press
ENTER on your keyboard. The
tag
name can be one or more words.
-
Edit an existing tag: Click
the tag you
wish to edit to enter
edit mode. Change the tag name and then
press
ENTER on your keyboard.
- Remove a tag: Click on the
(X) to the right of
the tag you wish to remove.
-
Click the [Save] button when you
are finished
adding, editing, or
removing a tag.
To display all content with a specific tag, click on the
desired tag
located either below
the content in the document library or in the
panel on the right hand side of the Document Library.
You can also search for content using tags as the search
term.
For more information, see the
Alfresco
Documentation: Tagging content.
Favorite
Content
within
a Collaboration Site
You can use the Favorite action to mark
library
content
that you access
often. This will add the content to your
My Favorites tab in the sidebar located
on the
right
hand side of the page.
-
In the Document Library, locate the content you want
to mark as
a
Favorite.
-
Click on the star icon located
under the
content
information.
The star icon changes once it is clicked to let you know
that the
content has been added to
your list of favorites. Click the star icon
again to remove the content from your favorites list.
Check your
My
Favorites folder in the sidebar to see the
content
you added.
For more information, see the
Alfresco
Documentation: Favoriting content.
Collaboration Site managers can edit a member's role
and remove
a
member from the site. To
change a member's role or to remove a member
from a site, a site manager should
do the
following:
-
In a collaboration site, select the
More
icon
in the Site Dashboard
menu, located in the top-right corner. Click on
Site Members.
- Select People in the Members
component.
-
Search for the site member whose role you want
to change by
typing a full or partial
name in the search box, or leave the search box
empty to display all members.
-
Click the current role and select a new role
from the list.
See
below for a description
of member roles and permissions.
Site Member Roles and Permissions:
-
Managers have full
rights to
all
site content - what they
have created themselves and what
other site
members
have created.
-
Collaborators have
full rights
to
the site content that
they own; they have rights to edit
but not
delete
content created by other site
members.
-
Contributors have
full rights
to
the site content that they
own; they cannot edit or delete
content created
by
other site members.
-
Consumers have
view-only rights
in a
site; they cannot
create their own content.
To remove a member from your site
click the
[Remove]
button.
For more information, see the
Alfresco
Documentation:
Managing site members.
External users may wish to join your
collaboration site. If
an
external user submits a
request to join your collaboration site and your
site has a Visibility
of
Public, Moderated site
membership, the site manager(s)
will receive
an email notification. To approve or reject an
external
user's
request to join your site,
the site manager should:
-
Click on the link provided in the email.
Below is an
example
of the email notification:
-
The link will bring you to the
Pending
Requests page in VSAC
Collaboration. Access the user's request by
clicking on
the [View] button.
-
You may approve or reject the request by
clicking on the
[Approve] or
[Reject] buttons. An
automated
email will then be sent to the user
informing them of
your
decision. You may use the
comment box to provide the user with
additional
information regarding the reason for their
request being
approved or rejected
(optional). After selecting approve or
reject, the task
box will close and the task will be marked
as completed.
-
The automated email response sent to the
external user
includes your decision (approved
or rejected) and any additional information
you provided in the Comment box.
-
To review your previously completed external
user
requests,
go to your My Tasks page and
select on the Completed
link
on the left-hand side of the page. Locate
the desired
completed task and click on the
[View Workflow] button. The
Workflow Details page allows you to review
the user's
request and the decision made
(approved or rejected). You can also see any
comments you provided to the user.
You can access the VSAC Collaboration Tool through the VSAC Authoring Tool, as well as directly through the VSAC Collaboration Tool URL.
-
VSAC Authoring Tool: https://vsac.nlm.nih.gov/
(requires
pre-assigned
authoring
permissions)
- Within the Collaboration Management tab, select one of your Collaboration Site URLs.
- Within the Authoring tab, in the Collaboration menu on the left of the value set's editing screen, select Visit Site. If the Visit Site link is grey this means you have not yet created a Collaboration Site for this value set.
- VSAC Collaboration Tool: https://vsaccollab.nlm.nih.gov/
The VSAC Collaboration Tool provides two types of dashboards: Personal Dashboard and Site Dashboard.
Personal Dashboard
The VSAC Collaboration Tool creates a Personal Dashboard for each user. The Personal Dashboard displays links to all of a user's value set collaboration sites, activities, and discussions. Your first and last name serve as the title of your Personal Dashboard. Use the Home link on the top bar to return to your Personal Dashboard from any other page to which you navigate.
Site Dashboard
The VSAC Collaboration Tool creates a Site Dashboard when a VSAC author creates a collaboration site within the VSAC Authoring Tool. VSAC authors may create a collaboration site for a single value set, as well as collaboration sites for user-designated collections of value sets. For each value set or group of value sets, the Site Dashboard displays user-posted value set content and collaborator discussions for that value set.
Once created, a collaboration site will appear under the My Sites dashlet on the Personal Dashboard. New users of the VSAC Collaboration Tool will not have any sites appear under their My Site dashlet until they create a collaboration site within the VSAC Authoring Tool.
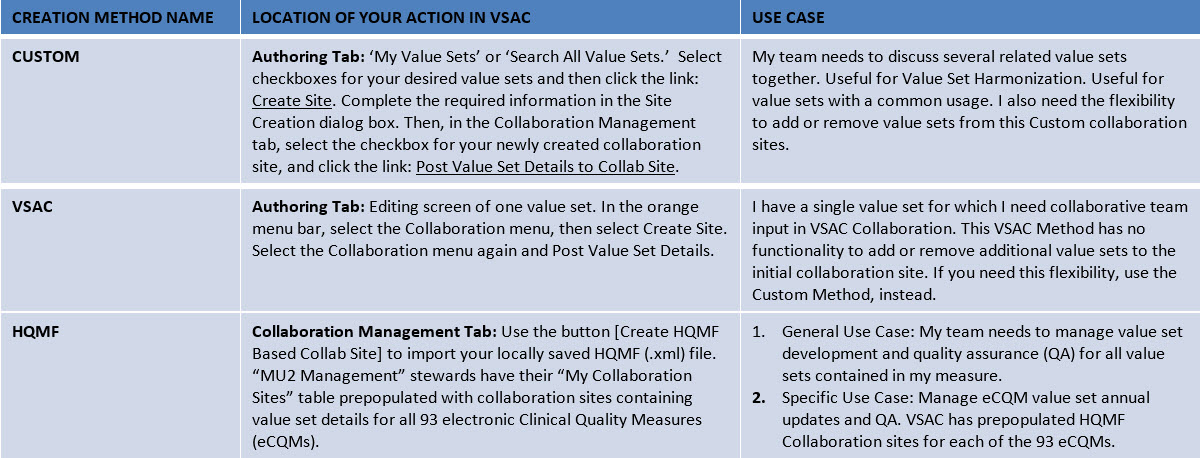
There are three methods to create collaboration sites and post value set details to the
VSAC
Collaboration Tool:
Custom Method
The Custom method is useful when you need to gather several VSAC value sets into one
collaboration site. This Custom method is also
useful for a single value set collaboration site, when you need flexibility to add or
remove
value sets from your collaboration site in
the future.
-
From My Value Sets or Search All Value Sets in the VSAC Authoring Tool, you can
select one or several value sets and create a
collaboration site where you will subsequently post the value set details. You
can
use the table's sort (click on column headers)
and filter (type text into search boxes at the top of each column) functions.
You
can also use your pre-assigned and
steward-specific Keywords
to find the
value sets you need for your collaboration site. Here, we show you how you can
create a collaboration site by selecting multiple
value sets in your My Value Sets list:
-
The Site Creation dialog box prompts you to choose your Collaboration Site
Managers
from one or more of your VSAC Steward and/or
Author Groups to which you belong, and it prompts you to create a Collaboration
Site
Name for your new collaboration site. In the
screen shot example below, we named our example collaboration site "Cardiac Care
Medications," and this collaboration site will host
the example value sets we checked off in Figure 4 (Dipyridamole and Nifedipine).
Within the VSAC Collaboration Tool, site managers
are able to invite additional collaborators who have UMLS Licenses. Site
managers
can change roles of any site members.
-
Once you create your new collaboration site, you may post value set details to
this
collaboration site. Your new collaboration site
will be essentially an empty shell until you post your selected value set
details.
Here is how to do that:
In the Collaboration Management tab, select the checkbox next to your desired
Collaboration Site Name, and then select the
Post Value Set Details to Collab Site link.
-
When you click Post Value Set Details to Collab Site, you will
receive the following dialog box shown in Figure 7.
Here, you can choose the
Expansion
Profile with which you would
like your value sets expanded when you send them to your collaboration site. The
default selection is "Most Recent Code System
Versions in VSAC." You can check the “Apply CMS eCQM QA Rules†that contain
CMS-defined quality assurance checks for value sets
to be published within the eCQM programs.†You can also post a message to your
collaborators in the Post Message textbox. Your
message will appear in your collaboration Site Blog dashlet. You can select
draft
and published value sets when you Post Value Set
Details to Collab Site. This action will not publish draft value sets into the
public VSAC repository, and no external
implementation should ever use a draft value set.
VSAC Method
The VSAC method of collaboration site creation is useful when you need to create a
collaboration site for only a single value set and
you would like to have the convenience to create your collaboration site from within the
value set editing screen of the VSAC Authoring
Tool. The VSAC method can be limiting for you, however, because you cannot add more
value
sets to a collaboration site that you create
using the VSAC method.
-
Create Collaboration Site:
In the VSAC Authoring Tool, create and save a value set. The Collaboration tab
appears in the orange tool bar to the left of the
Harmonization and Report menus. On the Collaboration pull down menu, select
Create Site.
-
Post your value set to your newly created Collaboration Site:
On the Collaboration pull down menu, select Post Value Set
Details.
Here, you can choose the Expansion Profile with
which you would like your value sets expanded when you send them to your
collaboration site. The default selection is "Most Recent
Code System Versions in VSAC. You can check the “Apply CMS eCQM QA Rulesâ€
that
contain CMS-defined quality assurance checks for
value sets to be published within the eCQM programs. You can also post a message
in
the Post Message textbox, to your collaborators,
so they are alerted to your posting and understand your reason for posting. Your
message will appear on your collaboration site Blog
dashlet. You can select draft and/or published value sets when you Post Value
Set
Details to Collab Site. This action will not
publish draft value sets into the public VSAC repository, and no external
implementation should ever use a draft value set.
-
Visit your Collaboration Site:
On the Collaboration pull down menu, select Visit Site.
Alternatively, you can navigate to your VSAC-method created collaboration site
through the Collaboration Management tab.
HQMF Method
The HQMF method is useful when you have used a tool like the Measure Authoring Tool that
produces an HQMF (.xml) file in which you have included VSAC value sets as data
elements.
The goal is to create a collaboration site
that will contain all of the value sets for your measure, so that you and your
collaborator(s) can discuss and share information about
those value sets within the context of your measure. When you create a collaboration
site
based on an HQMF file, VSAC will read the list
of value sets object identifiers (OIDs) that you included in your HQMF file, and VSAC
creates a collaboration site with a holding place
for each of those listed value sets in your measure. When you post value set details to
your
HQMF-method collaboration site, VSAC pushes
to the collaboration site the value set details of every value set listed in your HQMF
file.
Here, we show how you can create a
collaboration site using this HQMF method. You will first need to download your desired
HQMF
xml file from the Measure Authoring Tool,
or from another tool that produces HQMF xml.
-
In the Collaboration Management tab, click the Create HQMF Based Collab
Site button.
-
Browse your local computer files to select your desired HQMF file that you have
already downloaded from a measure authoring tool
that produces HQMF files.
-
Import your desired local HQMF file.
-
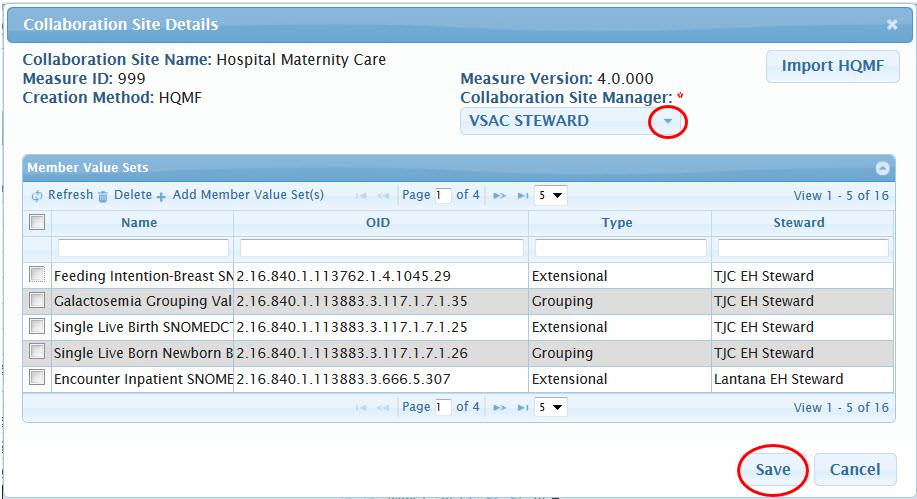
The Collaboration Site Details dialog will show you the measure information that
VSAC extracted from your HQMF file. VSAC assigns
the measure name as the Collaboration Site Name. You need to choose which of
your
steward groups you want for the Collaboration Site
Manager. You can also add or delete member value sets from your collaboration
site.
This delete action does not remove your selected
value sets from the actual measure or from VSAC, only from the collaboration
site if
you choose to do so. When you are satisfied
with your changes, choose the [Save] button to finalize
creation of
your HQMF based collaboration site. If you make
any changes to your actual measure (in the Measure Authoring Tool, for example),
you
will want to download the updated measure's
HQMF file to your computer and then choose Import HQMF to load the updated HQMF
file
to your collaboration site.
-
Once you create your new HQMF based collaboration site, you may post your value
set
to the collaboration site. Your new
collaboration site will be essentially an empty shell until you post your
selected
value set details. Here is how to do that. When
you click the [Save] button in the previous Collaboration Site
Details dialog, the dialog window shows the active
Collaboration Site URL, and it provides a button at the bottom to Post
Value
Set Details to Collab Site. There are
several other ways to post your value set details to your collaboration site,
and we
will explore those options in a later section:
Schedule Automatic Expansions of Value Sets into VSAC Collaboration.
-
To edit the details (visibility and permissions, name, or description) of a
collaboration site, visit a VSAC Collaboration site for
a value set that you created in VSAC Authoring.
-
Notice a gear symbol in the top right corner of the Site Dashboard for your
value
set
site.
-
Click the gear, revealing a pull down menu.
-
Choose Edit Site Details.
-
Observe the Edit Site Details dialog window:
-
Here, you can change your collaboration site Name and
Description. If you change the site Name and
Description in the Edit Site Details window, the changes will not be
reflected
in
VSAC Authoring. These labels are specific to VSAC
Collaboration only.
We encourage you to edit the site Name and Description for sites created
using
the
Custom method or HQMF method. However, we do not
recommend you edit the Name and Description of collaboration sites created
using
the
VSAC method because the site Name defaults to
your value set name in VSAC, and the Description defaults to the value set
OID
in
VSAC.
-
Observe the Visibility options. There are 3 levels of
visibility
available for collaboration sites:
Public, Public with Moderated site membership,
and
Private.
-
We have set the default visibility for all VSAC Collaboration sites to
be
Public, which means the site is
searchable for users external to your group, and external users can view
your
content and contribute to discussion topics.
-
Public with Moderated site membership, which means the
site
is
searchable for users external to your group, but
you have control over who your site members are. You may add additional
members
to join your site, and external users can ask to
join your site, but this requires your approval. Users who are external
to
your
group will be able to find your collaboration
site, but the site will display only the site name and a blank page with
all
content hidden.
-
Private level of visibility renders your collaboration
site
undiscoverable and unsearchable to anyone who is not
a member of your group. Only your authors, stewards, and invited
collaborators
will have access to your collaboration site.
1. Add other people to be members of a VSAC Collaboration site for a value set
that
you
created in VSAC Authoring.
2. To add other people to a VSAC Colloboration site, you will need the
'managers'
user role
for the site. In the top right corner of the
Site Dashboard, click the person-shaped icon next to the [More]
button.
This will take you directly to the menu where
you can search for people to add to your site. Enter the name and/or UMLS
username
of
someone you would like to add to your site as a
collaborator. Only registered UMLS users can be added to your site. Non-UMLS
licensed users
who would like to join a VSAC Collaboration
Site may request a UMLS license here.
You may also
access the search menu by clicking on the [More] button, and then select Site
Members.
3. After you select the user’s name, choose the new member's Role
for
the content site. You will need to select a
Role for each member you would like to add to the site. You may also assign the
same
Role to
all members in a single step by selecting
the [Set All Roles to] button and then selecting the desired
Role.
After
you have selected all of the members you wish
to add to your site, and have assigned a Role to each of them, click the
[Add
Users] button.
Site Member Roles and Permissions:
-
Managers have full rights to all site content - what
they
have
created themselves and what other site members have
created.
-
Collaborators have full rights to the site content that
they own;
they have rights to edit but not delete content
created by other site members.
-
Contributors have full rights to the site content that
they
own;
they cannot edit or delete content created by
other site members.
-
Consumers have view-only rights in a site; they cannot
create their
own content.
For more information, see the
Alfresco
Documentation: User roles and permissions.
From within the VSAC Authoring Tool, access the Collaboration Content Site
for a specific
value set.
-
Log in to VSAC Authoring.
-
There are two ways to access a value set's content within a
collaboration site:
2.1 Accessing value set content through Collaboration Management tab:
-
Click on Collaboration Management tab.
-
Choose the collaboration site that contains the value set
you want by
clicking the hyperlinked
Collaboration Site URL. This will navigate
you directly to
the Site Dashboard of the selected collaboration
site within VSAC Collaboration.
2.2 Accessing value set content through Authoring tab:
-
Click the Authoring tab.
-
Choose your value set from My Value Sets by
clicking the
hyperlinked OID.
-
In the orange menu bar, click Collaboration
and then select
Visit Site from the drop-down
menu. This will navigate you directly to the Site Dashboard
of the selected
collaboration site within VSAC Collaboration.
-
In the Value Set Site Content dashlet, click on the
hyperlinked file
name.
-
Use the [Next] and [Previous] buttons,
in the header
bar of the spreadsheet view, to view each tab
of the spreadsheet. Click the [+] and
[-] buttons to
adjust the viewing size.
From within your value set site in VSAC Collaboration, export a document
to your
local
environment.
-
View the Excel file by clicking on the hyperlinked file name in
the Value Set
Site
Content dashlet.
-
Click the [Download] button in the header bar of
the
spreadsheet
view.
It is purposefully not within the scope of VSAC Collaboration to permit
file uploads
from
your local environment to VSAC Collaboration.
All value set creation and edits must take place within
the VSAC
Authoring
Tool.
For more information, see the
Alfresco
Documentation: Downloading files.
The Discussion Threads dashlet provides a space where site members
can post
comments
and
reply to comments about value set content
contained on that collaboration site. Each VSAC collaboration site
automatically
contains
three default discussion topics: Value Set
Usage, Value Set Purpose, and Value Set Content.
Add a new comment or reply to a comment in a current topic in the
Discussion
Threads
dashlet:
-
In the Discussion Threads dashlet, click the title of the topic
under which
you
want to
comment.
-
To add a new comment, click the Reply icon
on the far
right
of the
topic's heading page. Type your comment in the
Add Reply area and then click the
[Create]
button
at the bottom of your reply.
-
To reply to a comment, click the Reply icon
found on the
far
right of
the comments heading page. Type your reply in
the Reply to area and then click the
[Create]
button
at the bottom of your reply.
For more information, see the
Alfresco
Documentation: The discussion forum.
Site members can create new discussion
topics
in
addition to
the default topics as needed. Site stewards
can also edit an existing topic's
title
or delete an existing topic,
including default topics.
Add a new topic in the Discussion Threads
dashlet:
-
Click the (+) New Topic link in the top of
the
Discussion
Threads
dashlet. Type a new title in the Title text box and
add any desired text or tags. Click [Save]
when
finished.
The new topic
will now appear in the Discussion Threads
dashlet.
Edit an existing topic's title:
-
Click on the topic title (e.g., Value Set Usage) in the
Discussion
Threads dashlet.
-
Click on the Edit link to the right of
the topic.
-
Remove the old topic title from the Title text box and
replace it with a
new
topic
title. Click the [Save] button
when finished.
Delete a current topic in the Discussion
Threads
dashlet:
-
Click on the topic title (e.g., Value Set Usage) in the
Discussion
Threads
dashlet.
Click the (X) Delete link to the
right of the topic, and then confirm [Yes]
or
[Cancel]
in the subsequent popup.
Please be aware that if you delete a topic you will lose
all of the
content located
within that topic thread. If you decide to
delete a topic please communicate this decision to your
fellow
collaborators prior
to removing the topic from the Discussion Threads
dashlet.
For more information, see the
Alfresco
Documentation: The discussion forum.
You can control whether or not you receive VSAC
Collaboration
notifications
by email. To
review or change your notification settings:
-
Click on your name in the top black bar of VSAC
Collaboration.
-
Select My Profile to access your
User
Profile
Page.
-
Select Notifications in the features
bar at the
top.
-
If you wish to receive VSAC Collaboration notifications
by email,
check
the
Email Notification Feed checkbox and
then
click the [OK] button. If you do not
wish to
receive
email
notifications you will want to make sure the Email
Notification Feed checkbox is not checked and then click
the [OK]
button.
You can also enable and disable the notifications for
specific sites. To
review or change
your notification settings for specific sites:
-
From the User Profile Page, select
Sites in the
features bar at the top.
-
A list of all your collaboration sites will be
displayed. You can
enable
or disable the
notifications for a specific site by clicking
on the [Enable Activity Feeds] or
[Disable
Activity
Feeds] button on the far right of the site.
For more information, see the
Alfresco
Documentation: Controlling your email notifications.
The VSAC Collaboration Tool has multiple features that
will help you
manage site content.
These features include the ability to easily
move
files and
folders
within the current
site,
rename
content,
tag content,
and
create
favorites.
Move Content
within a
Collaboration Site
The VSAC Collaboration Tool has a drag and drop
functionality that
allows you to easily move
content around the site Document Library.
Please note, when you move a folder, all of its contents
move with
it.
-
In the collaboration site Document Library, locate
the file or
folder you want to move.
Click on the thumbnail of the file or folder
and, without releasing the mouse button, drag the
content to its
new
location.
-
Release the mouse button to move the content.
Note: The target folder must be visible
before you
move
the content. The
new location can be found in the panel on the
right hand side of the Document Library.
For more information, see the
Alfresco
Documentation: Dragging and dropping content.
Rename
Content within
a
Collaboration Site
You can quickly and easily rename the content within a
collaboration
site.
- Find the file or folder you want to rename in the
site Document
Library.
-
Hover the cursor on the content name to display the
pencil
icon.
-
Click the pencil icon to enter edit mode. Change the
name of the
content and then click
the Save icon to the right of
the text field or hit [ENTER] on
your keyboard.
Click the
Cancel icon to exit editing mode
and keep
the current content name.
Note: Please do not change the filename
extension.
For more information, see the
Alfresco
Documentation: Renaming content.
Tag Content within a
Collaboration
Site
To make content easier to find you can create and manage
tags for
files
and folders in the
collaboration site document library. To add
or edit tags for files and folders:
-
Navigate to the collaboration site's document
library by
selecting
the Document
Library icon, located on the Site
Dashboard menu in the upper-right hand corner. Find
the content
(file or folder) you
want to tag.
-
Hover your cursor over the No Tags
label to
display
the pencil
tag icon. If the file already has a
tag, hover your cursor on the tag to display the
pencil tag
icon.
Click the pencil tag
icon.
-
-
Add a new tag: Type the tag
name in the
textbox and then press
ENTER on your keyboard. The
tag
name can be one or more words.
-
Edit an existing tag: Click
the tag you
wish to edit to enter
edit mode. Change the tag name and then
press
ENTER on your keyboard.
- Remove a tag: Click on the
(X) to the right of
the tag you wish to remove.
-
Click the [Save] button when you
are finished
adding, editing, or
removing a tag.
To display all content with a specific tag, click on the
desired tag
located either below
the content in the document library or in the
panel on the right hand side of the Document Library.
You can also search for content using tags as the search
term.
For more information, see the
Alfresco
Documentation: Tagging content.
Favorite
Content
within
a Collaboration Site
You can use the Favorite action to mark
library
content
that you access
often. This will add the content to your
My Favorites tab in the sidebar located
on the
right
hand side of the page.
-
In the Document Library, locate the content you want
to mark as
a
Favorite.
-
Click on the star icon located
under the
content
information.
The star icon changes once it is clicked to let you know
that the
content has been added to
your list of favorites. Click the star icon
again to remove the content from your favorites list.
Check your
My
Favorites folder in the sidebar to see the
content
you added.
For more information, see the
Alfresco
Documentation: Favoriting content.
Collaboration Site managers can edit a member's role
and remove
a
member from the site. To
change a member's role or to remove a member
from a site, a site manager should
do the
following:
-
In a collaboration site, select the
More
icon
in the Site Dashboard
menu, located in the top-right corner. Click on
Site Members.
- Select People in the Members
component.
-
Search for the site member whose role you want
to change by
typing a full or partial
name in the search box, or leave the search box
empty to display all members.
-
Click the current role and select a new role
from the list.
See
below for a description
of member roles and permissions.
Site Member Roles and Permissions:
-
Managers have full
rights to
all
site content - what they
have created themselves and what
other site
members
have created.
-
Collaborators have
full rights
to
the site content that
they own; they have rights to edit
but not
delete
content created by other site
members.
-
Contributors have
full rights
to
the site content that they
own; they cannot edit or delete
content created
by
other site members.
-
Consumers have
view-only rights
in a
site; they cannot
create their own content.
To remove a member from your site
click the
[Remove]
button.
For more information, see the
Alfresco
Documentation:
Managing site members.
External users may wish to join your
collaboration site. If
an
external user submits a
request to join your collaboration site and your
site has a Visibility
of
Public, Moderated site
membership, the site manager(s)
will receive
an email notification. To approve or reject an
external
user's
request to join your site,
the site manager should:
-
Click on the link provided in the email.
Below is an
example
of the email notification:
-
The link will bring you to the
Pending
Requests page in VSAC
Collaboration. Access the user's request by
clicking on
the [View] button.
-
You may approve or reject the request by
clicking on the
[Approve] or
[Reject] buttons. An
automated
email will then be sent to the user
informing them of
your
decision. You may use the
comment box to provide the user with
additional
information regarding the reason for their
request being
approved or rejected
(optional). After selecting approve or
reject, the task
box will close and the task will be marked
as completed.
-
The automated email response sent to the
external user
includes your decision (approved
or rejected) and any additional information
you provided in the Comment box.
-
To review your previously completed external
user
requests,
go to your My Tasks page and
select on the Completed
link
on the left-hand side of the page. Locate
the desired
completed task and click on the
[View Workflow] button. The
Workflow Details page allows you to review
the user's
request and the decision made
(approved or rejected). You can also see any
comments you provided to the user.
There are three methods to create collaboration sites and post value set details to the VSAC Collaboration Tool:
Custom Method
The Custom method is useful when you need to gather several VSAC value sets into one collaboration site. This Custom method is also useful for a single value set collaboration site, when you need flexibility to add or remove value sets from your collaboration site in the future.
-
From My Value Sets or Search All Value Sets in the VSAC Authoring Tool, you can select one or several value sets and create a collaboration site where you will subsequently post the value set details. You can use the table's sort (click on column headers) and filter (type text into search boxes at the top of each column) functions. You can also use your pre-assigned and steward-specific Keywords to find the value sets you need for your collaboration site. Here, we show you how you can create a collaboration site by selecting multiple value sets in your My Value Sets list:
-
The Site Creation dialog box prompts you to choose your Collaboration Site Managers from one or more of your VSAC Steward and/or Author Groups to which you belong, and it prompts you to create a Collaboration Site Name for your new collaboration site. In the screen shot example below, we named our example collaboration site "Cardiac Care Medications," and this collaboration site will host the example value sets we checked off in Figure 4 (Dipyridamole and Nifedipine). Within the VSAC Collaboration Tool, site managers are able to invite additional collaborators who have UMLS Licenses. Site managers can change roles of any site members.
-
Once you create your new collaboration site, you may post value set details to this collaboration site. Your new collaboration site will be essentially an empty shell until you post your selected value set details. Here is how to do that:
In the Collaboration Management tab, select the checkbox next to your desired Collaboration Site Name, and then select the Post Value Set Details to Collab Site link.
-
When you click Post Value Set Details to Collab Site, you will receive the following dialog box shown in Figure 7. Here, you can choose the Expansion Profile with which you would like your value sets expanded when you send them to your collaboration site. The default selection is "Most Recent Code System Versions in VSAC." You can check the “Apply CMS eCQM QA Rules†that contain CMS-defined quality assurance checks for value sets to be published within the eCQM programs.†You can also post a message to your collaborators in the Post Message textbox. Your message will appear in your collaboration Site Blog dashlet. You can select draft and published value sets when you Post Value Set Details to Collab Site. This action will not publish draft value sets into the public VSAC repository, and no external implementation should ever use a draft value set.
VSAC Method
The VSAC method of collaboration site creation is useful when you need to create a collaboration site for only a single value set and you would like to have the convenience to create your collaboration site from within the value set editing screen of the VSAC Authoring Tool. The VSAC method can be limiting for you, however, because you cannot add more value sets to a collaboration site that you create using the VSAC method.
-
Create Collaboration Site:
In the VSAC Authoring Tool, create and save a value set. The Collaboration tab appears in the orange tool bar to the left of the Harmonization and Report menus. On the Collaboration pull down menu, select Create Site.
-
Post your value set to your newly created Collaboration Site:
On the Collaboration pull down menu, select Post Value Set Details. Here, you can choose the Expansion Profile with which you would like your value sets expanded when you send them to your collaboration site. The default selection is "Most Recent Code System Versions in VSAC. You can check the “Apply CMS eCQM QA Rules†that contain CMS-defined quality assurance checks for value sets to be published within the eCQM programs. You can also post a message in the Post Message textbox, to your collaborators, so they are alerted to your posting and understand your reason for posting. Your message will appear on your collaboration site Blog dashlet. You can select draft and/or published value sets when you Post Value Set Details to Collab Site. This action will not publish draft value sets into the public VSAC repository, and no external implementation should ever use a draft value set.
-
Visit your Collaboration Site:
On the Collaboration pull down menu, select Visit Site.
Alternatively, you can navigate to your VSAC-method created collaboration site through the Collaboration Management tab.
HQMF Method
The HQMF method is useful when you have used a tool like the Measure Authoring Tool that produces an HQMF (.xml) file in which you have included VSAC value sets as data elements. The goal is to create a collaboration site that will contain all of the value sets for your measure, so that you and your collaborator(s) can discuss and share information about those value sets within the context of your measure. When you create a collaboration site based on an HQMF file, VSAC will read the list of value sets object identifiers (OIDs) that you included in your HQMF file, and VSAC creates a collaboration site with a holding place for each of those listed value sets in your measure. When you post value set details to your HQMF-method collaboration site, VSAC pushes to the collaboration site the value set details of every value set listed in your HQMF file. Here, we show how you can create a collaboration site using this HQMF method. You will first need to download your desired HQMF xml file from the Measure Authoring Tool, or from another tool that produces HQMF xml.
-
In the Collaboration Management tab, click the Create HQMF Based Collab Site button.
-
Browse your local computer files to select your desired HQMF file that you have already downloaded from a measure authoring tool that produces HQMF files.
-
Import your desired local HQMF file.
-
The Collaboration Site Details dialog will show you the measure information that VSAC extracted from your HQMF file. VSAC assigns the measure name as the Collaboration Site Name. You need to choose which of your steward groups you want for the Collaboration Site Manager. You can also add or delete member value sets from your collaboration site. This delete action does not remove your selected value sets from the actual measure or from VSAC, only from the collaboration site if you choose to do so. When you are satisfied with your changes, choose the [Save] button to finalize creation of your HQMF based collaboration site. If you make any changes to your actual measure (in the Measure Authoring Tool, for example), you will want to download the updated measure's HQMF file to your computer and then choose Import HQMF to load the updated HQMF file to your collaboration site.
-
Once you create your new HQMF based collaboration site, you may post your value set to the collaboration site. Your new collaboration site will be essentially an empty shell until you post your selected value set details. Here is how to do that. When you click the [Save] button in the previous Collaboration Site Details dialog, the dialog window shows the active Collaboration Site URL, and it provides a button at the bottom to Post Value Set Details to Collab Site. There are several other ways to post your value set details to your collaboration site, and we will explore those options in a later section: Schedule Automatic Expansions of Value Sets into VSAC Collaboration.
-
To edit the details (visibility and permissions, name, or description) of a collaboration site, visit a VSAC Collaboration site for a value set that you created in VSAC Authoring.
-
Notice a gear symbol in the top right corner of the Site Dashboard for your value set site.
-
Click the gear, revealing a pull down menu.
-
Choose Edit Site Details.
-
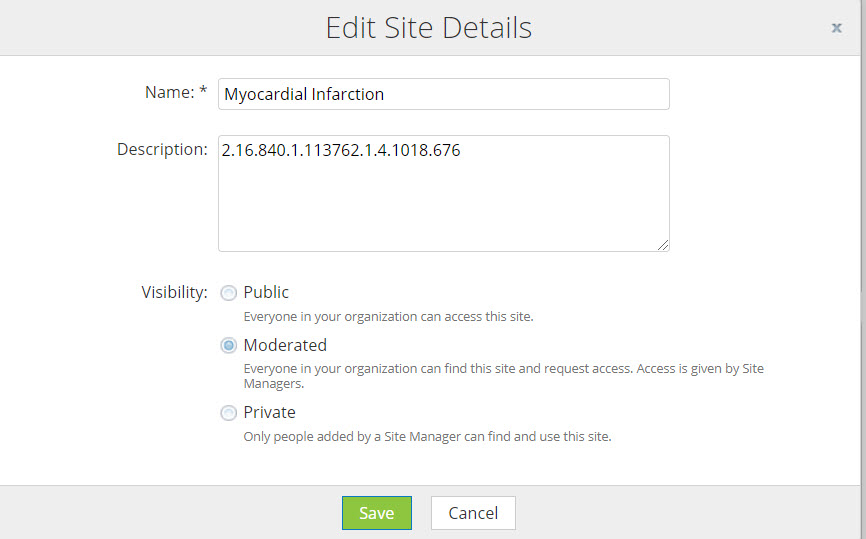
Observe the Edit Site Details dialog window:
-
Here, you can change your collaboration site Name and Description. If you change the site Name and Description in the Edit Site Details window, the changes will not be reflected in VSAC Authoring. These labels are specific to VSAC Collaboration only.
We encourage you to edit the site Name and Description for sites created using the Custom method or HQMF method. However, we do not recommend you edit the Name and Description of collaboration sites created using the VSAC method because the site Name defaults to your value set name in VSAC, and the Description defaults to the value set OID in VSAC.
-
Observe the Visibility options. There are 3 levels of
visibility
available for collaboration sites:
Public, Public with Moderated site membership,
and
Private.
- We have set the default visibility for all VSAC Collaboration sites to be Public, which means the site is searchable for users external to your group, and external users can view your content and contribute to discussion topics.
- Public with Moderated site membership, which means the site is searchable for users external to your group, but you have control over who your site members are. You may add additional members to join your site, and external users can ask to join your site, but this requires your approval. Users who are external to your group will be able to find your collaboration site, but the site will display only the site name and a blank page with all content hidden.
- Private level of visibility renders your collaboration site undiscoverable and unsearchable to anyone who is not a member of your group. Only your authors, stewards, and invited collaborators will have access to your collaboration site.
1. Add other people to be members of a VSAC Collaboration site for a value set
that
you
created in VSAC Authoring.
2. To add other people to a VSAC Colloboration site, you will need the
'managers'
user role
for the site. In the top right corner of the
Site Dashboard, click the person-shaped icon next to the [More]
button.
This will take you directly to the menu where
you can search for people to add to your site. Enter the name and/or UMLS
username
of
someone you would like to add to your site as a
collaborator. Only registered UMLS users can be added to your site. Non-UMLS
licensed users
who would like to join a VSAC Collaboration
Site may request a UMLS license here.
You may also
access the search menu by clicking on the [More] button, and then select Site
Members.
3. After you select the user’s name, choose the new member's Role
for
the content site. You will need to select a
Role for each member you would like to add to the site. You may also assign the
same
Role to
all members in a single step by selecting
the [Set All Roles to] button and then selecting the desired
Role.
After
you have selected all of the members you wish
to add to your site, and have assigned a Role to each of them, click the
[Add
Users] button.
Site Member Roles and Permissions:
-
Managers have full rights to all site content - what
they
have
created themselves and what other site members have
created.
-
Collaborators have full rights to the site content that
they own;
they have rights to edit but not delete content
created by other site members.
-
Contributors have full rights to the site content that
they
own;
they cannot edit or delete content created by
other site members.
-
Consumers have view-only rights in a site; they cannot
create their
own content.
For more information, see the
Alfresco
Documentation: User roles and permissions.
From within the VSAC Authoring Tool, access the Collaboration Content Site
for a specific
value set.
-
Log in to VSAC Authoring.
-
There are two ways to access a value set's content within a
collaboration site:
2.1 Accessing value set content through Collaboration Management tab:
-
Click on Collaboration Management tab.
-
Choose the collaboration site that contains the value set
you want by
clicking the hyperlinked
Collaboration Site URL. This will navigate
you directly to
the Site Dashboard of the selected collaboration
site within VSAC Collaboration.
2.2 Accessing value set content through Authoring tab:
-
Click the Authoring tab.
-
Choose your value set from My Value Sets by
clicking the
hyperlinked OID.
-
In the orange menu bar, click Collaboration
and then select
Visit Site from the drop-down
menu. This will navigate you directly to the Site Dashboard
of the selected
collaboration site within VSAC Collaboration.
-
In the Value Set Site Content dashlet, click on the
hyperlinked file
name.
-
Use the [Next] and [Previous] buttons,
in the header
bar of the spreadsheet view, to view each tab
of the spreadsheet. Click the [+] and
[-] buttons to
adjust the viewing size.
From within your value set site in VSAC Collaboration, export a document
to your
local
environment.
-
View the Excel file by clicking on the hyperlinked file name in
the Value Set
Site
Content dashlet.
-
Click the [Download] button in the header bar of
the
spreadsheet
view.
It is purposefully not within the scope of VSAC Collaboration to permit
file uploads
from
your local environment to VSAC Collaboration.
All value set creation and edits must take place within
the VSAC
Authoring
Tool.
For more information, see the
Alfresco
Documentation: Downloading files.
The Discussion Threads dashlet provides a space where site members
can post
comments
and
reply to comments about value set content
contained on that collaboration site. Each VSAC collaboration site
automatically
contains
three default discussion topics: Value Set
Usage, Value Set Purpose, and Value Set Content.
Add a new comment or reply to a comment in a current topic in the
Discussion
Threads
dashlet:
-
In the Discussion Threads dashlet, click the title of the topic
under which
you
want to
comment.
-
To add a new comment, click the Reply icon
on the far
right
of the
topic's heading page. Type your comment in the
Add Reply area and then click the
[Create]
button
at the bottom of your reply.
-
To reply to a comment, click the Reply icon
found on the
far
right of
the comments heading page. Type your reply in
the Reply to area and then click the
[Create]
button
at the bottom of your reply.
For more information, see the
Alfresco
Documentation: The discussion forum.
Site members can create new discussion
topics
in
addition to
the default topics as needed. Site stewards
can also edit an existing topic's
title
or delete an existing topic,
including default topics.
Add a new topic in the Discussion Threads
dashlet:
-
Click the (+) New Topic link in the top of
the
Discussion
Threads
dashlet. Type a new title in the Title text box and
add any desired text or tags. Click [Save]
when
finished.
The new topic
will now appear in the Discussion Threads
dashlet.
Edit an existing topic's title:
-
Click on the topic title (e.g., Value Set Usage) in the
Discussion
Threads dashlet.
-
Click on the Edit link to the right of
the topic.
-
Remove the old topic title from the Title text box and
replace it with a
new
topic
title. Click the [Save] button
when finished.
Delete a current topic in the Discussion
Threads
dashlet:
-
Click on the topic title (e.g., Value Set Usage) in the
Discussion
Threads
dashlet.
Click the (X) Delete link to the
right of the topic, and then confirm [Yes]
or
[Cancel]
in the subsequent popup.
Please be aware that if you delete a topic you will lose
all of the
content located
within that topic thread. If you decide to
delete a topic please communicate this decision to your
fellow
collaborators prior
to removing the topic from the Discussion Threads
dashlet.
For more information, see the
Alfresco
Documentation: The discussion forum.
You can control whether or not you receive VSAC
Collaboration
notifications
by email. To
review or change your notification settings:
-
Click on your name in the top black bar of VSAC
Collaboration.
-
Select My Profile to access your
User
Profile
Page.
-
Select Notifications in the features
bar at the
top.
-
If you wish to receive VSAC Collaboration notifications
by email,
check
the
Email Notification Feed checkbox and
then
click the [OK] button. If you do not
wish to
receive
email
notifications you will want to make sure the Email
Notification Feed checkbox is not checked and then click
the [OK]
button.
You can also enable and disable the notifications for
specific sites. To
review or change
your notification settings for specific sites:
-
From the User Profile Page, select
Sites in the
features bar at the top.
-
A list of all your collaboration sites will be
displayed. You can
enable
or disable the
notifications for a specific site by clicking
on the [Enable Activity Feeds] or
[Disable
Activity
Feeds] button on the far right of the site.
For more information, see the
Alfresco
Documentation: Controlling your email notifications.
The VSAC Collaboration Tool has multiple features that
will help you
manage site content.
These features include the ability to easily
move
files and
folders
within the current
site,
rename
content,
tag content,
and
create
favorites.
Move Content
within a
Collaboration Site
The VSAC Collaboration Tool has a drag and drop
functionality that
allows you to easily move
content around the site Document Library.
Please note, when you move a folder, all of its contents
move with
it.
-
In the collaboration site Document Library, locate
the file or
folder you want to move.
Click on the thumbnail of the file or folder
and, without releasing the mouse button, drag the
content to its
new
location.
-
Release the mouse button to move the content.
Note: The target folder must be visible
before you
move
the content. The
new location can be found in the panel on the
right hand side of the Document Library.
For more information, see the
Alfresco
Documentation: Dragging and dropping content.
Rename
Content within
a
Collaboration Site
You can quickly and easily rename the content within a
collaboration
site.
- Find the file or folder you want to rename in the
site Document
Library.
-
Hover the cursor on the content name to display the
pencil
icon.
-
Click the pencil icon to enter edit mode. Change the
name of the
content and then click
the Save icon to the right of
the text field or hit [ENTER] on
your keyboard.
Click the
Cancel icon to exit editing mode
and keep
the current content name.
Note: Please do not change the filename
extension.
For more information, see the
Alfresco
Documentation: Renaming content.
Tag Content within a
Collaboration
Site
To make content easier to find you can create and manage
tags for
files
and folders in the
collaboration site document library. To add
or edit tags for files and folders:
-
Navigate to the collaboration site's document
library by
selecting
the Document
Library icon, located on the Site
Dashboard menu in the upper-right hand corner. Find
the content
(file or folder) you
want to tag.
-
Hover your cursor over the No Tags
label to
display
the pencil
tag icon. If the file already has a
tag, hover your cursor on the tag to display the
pencil tag
icon.
Click the pencil tag
icon.
-
-
Add a new tag: Type the tag
name in the
textbox and then press
ENTER on your keyboard. The
tag
name can be one or more words.
-
Edit an existing tag: Click
the tag you
wish to edit to enter
edit mode. Change the tag name and then
press
ENTER on your keyboard.
- Remove a tag: Click on the
(X) to the right of
the tag you wish to remove.
-
Click the [Save] button when you
are finished
adding, editing, or
removing a tag.
To display all content with a specific tag, click on the
desired tag
located either below
the content in the document library or in the
panel on the right hand side of the Document Library.
You can also search for content using tags as the search
term.
For more information, see the
Alfresco
Documentation: Tagging content.
Favorite
Content
within
a Collaboration Site
You can use the Favorite action to mark
library
content
that you access
often. This will add the content to your
My Favorites tab in the sidebar located
on the
right
hand side of the page.
-
In the Document Library, locate the content you want
to mark as
a
Favorite.
-
Click on the star icon located
under the
content
information.
The star icon changes once it is clicked to let you know
that the
content has been added to
your list of favorites. Click the star icon
again to remove the content from your favorites list.
Check your
My
Favorites folder in the sidebar to see the
content
you added.
For more information, see the
Alfresco
Documentation: Favoriting content.
Collaboration Site managers can edit a member's role
and remove
a
member from the site. To
change a member's role or to remove a member
from a site, a site manager should
do the
following:
-
In a collaboration site, select the
More
icon
in the Site Dashboard
menu, located in the top-right corner. Click on
Site Members.
- Select People in the Members
component.
-
Search for the site member whose role you want
to change by
typing a full or partial
name in the search box, or leave the search box
empty to display all members.
-
Click the current role and select a new role
from the list.
See
below for a description
of member roles and permissions.
Site Member Roles and Permissions:
-
Managers have full
rights to
all
site content - what they
have created themselves and what
other site
members
have created.
-
Collaborators have
full rights
to
the site content that
they own; they have rights to edit
but not
delete
content created by other site
members.
-
Contributors have
full rights
to
the site content that they
own; they cannot edit or delete
content created
by
other site members.
-
Consumers have
view-only rights
in a
site; they cannot
create their own content.
To remove a member from your site
click the
[Remove]
button.
For more information, see the
Alfresco
Documentation:
Managing site members.
External users may wish to join your
collaboration site. If
an
external user submits a
request to join your collaboration site and your
site has a Visibility
of
Public, Moderated site
membership, the site manager(s)
will receive
an email notification. To approve or reject an
external
user's
request to join your site,
the site manager should:
-
Click on the link provided in the email.
Below is an
example
of the email notification:
-
The link will bring you to the
Pending
Requests page in VSAC
Collaboration. Access the user's request by
clicking on
the [View] button.
-
You may approve or reject the request by
clicking on the
[Approve] or
[Reject] buttons. An
automated
email will then be sent to the user
informing them of
your
decision. You may use the
comment box to provide the user with
additional
information regarding the reason for their
request being
approved or rejected
(optional). After selecting approve or
reject, the task
box will close and the task will be marked
as completed.
-
The automated email response sent to the
external user
includes your decision (approved
or rejected) and any additional information
you provided in the Comment box.
-
To review your previously completed external
user
requests,
go to your My Tasks page and
select on the Completed
link
on the left-hand side of the page. Locate
the desired
completed task and click on the
[View Workflow] button. The
Workflow Details page allows you to review
the user's
request and the decision made
(approved or rejected). You can also see any
comments you provided to the user.
1. Add other people to be members of a VSAC Collaboration site for a value set that you created in VSAC Authoring.
2. To add other people to a VSAC Colloboration site, you will need the 'managers' user role for the site. In the top right corner of the Site Dashboard, click the person-shaped icon next to the [More] button. This will take you directly to the menu where you can search for people to add to your site. Enter the name and/or UMLS username of someone you would like to add to your site as a collaborator. Only registered UMLS users can be added to your site. Non-UMLS licensed users who would like to join a VSAC Collaboration Site may request a UMLS license here. You may also access the search menu by clicking on the [More] button, and then select Site Members.
3. After you select the user’s name, choose the new member's Role for the content site. You will need to select a Role for each member you would like to add to the site. You may also assign the same Role to all members in a single step by selecting the [Set All Roles to] button and then selecting the desired Role. After you have selected all of the members you wish to add to your site, and have assigned a Role to each of them, click the [Add Users] button.
Site Member Roles and Permissions:
-
Managers have full rights to all site content - what they have created themselves and what other site members have created.
-
Collaborators have full rights to the site content that they own; they have rights to edit but not delete content created by other site members.
-
Contributors have full rights to the site content that they own; they cannot edit or delete content created by other site members.
-
Consumers have view-only rights in a site; they cannot create their own content.
For more information, see the Alfresco Documentation: User roles and permissions.
From within the VSAC Authoring Tool, access the Collaboration Content Site for a specific value set.
-
Log in to VSAC Authoring.
-
There are two ways to access a value set's content within a
collaboration site:
2.1 Accessing value set content through Collaboration Management tab:
-
Click on Collaboration Management tab.
-
Choose the collaboration site that contains the value set you want by clicking the hyperlinked Collaboration Site URL. This will navigate you directly to the Site Dashboard of the selected collaboration site within VSAC Collaboration.
2.2 Accessing value set content through Authoring tab:
-
Click the Authoring tab.
-
Choose your value set from My Value Sets by clicking the hyperlinked OID.
-
In the orange menu bar, click Collaboration and then select Visit Site from the drop-down menu. This will navigate you directly to the Site Dashboard of the selected collaboration site within VSAC Collaboration.
-
-
In the Value Set Site Content dashlet, click on the
hyperlinked file
name.
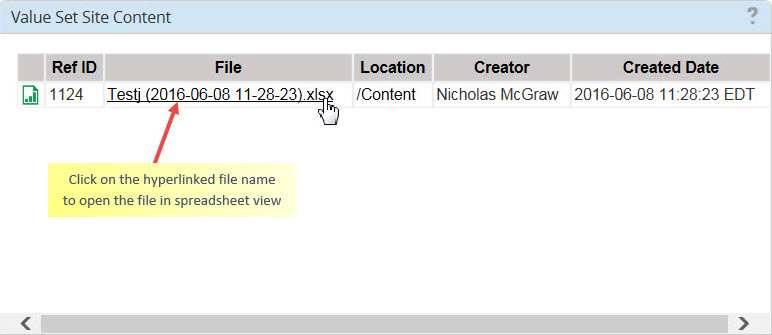
-
Use the [Next] and [Previous] buttons,
in the header
bar of the spreadsheet view, to view each tab
of the spreadsheet. Click the [+] and
[-] buttons to
adjust the viewing size.
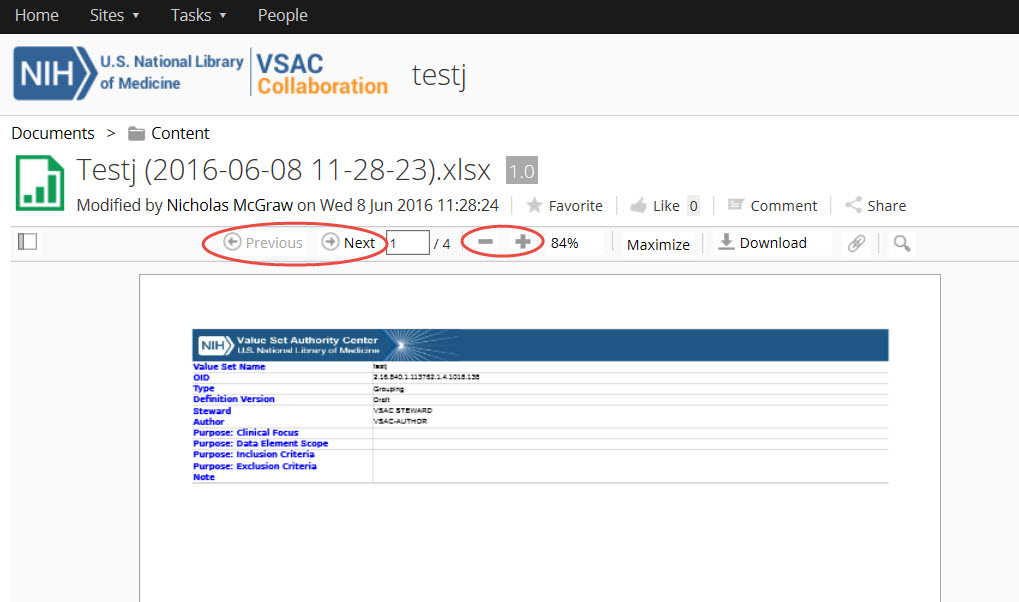
From within your value set site in VSAC Collaboration, export a document
to your
local
environment.
-
View the Excel file by clicking on the hyperlinked file name in
the Value Set
Site
Content dashlet.
-
Click the [Download] button in the header bar of
the
spreadsheet
view.
It is purposefully not within the scope of VSAC Collaboration to permit
file uploads
from
your local environment to VSAC Collaboration.
All value set creation and edits must take place within
the VSAC
Authoring
Tool.
For more information, see the
Alfresco
Documentation: Downloading files.
The Discussion Threads dashlet provides a space where site members
can post
comments
and
reply to comments about value set content
contained on that collaboration site. Each VSAC collaboration site
automatically
contains
three default discussion topics: Value Set
Usage, Value Set Purpose, and Value Set Content.
Add a new comment or reply to a comment in a current topic in the
Discussion
Threads
dashlet:
-
In the Discussion Threads dashlet, click the title of the topic
under which
you
want to
comment.
-
To add a new comment, click the Reply icon
on the far
right
of the
topic's heading page. Type your comment in the
Add Reply area and then click the
[Create]
button
at the bottom of your reply.
-
To reply to a comment, click the Reply icon
found on the
far
right of
the comments heading page. Type your reply in
the Reply to area and then click the
[Create]
button
at the bottom of your reply.
For more information, see the
Alfresco
Documentation: The discussion forum.
Site members can create new discussion
topics
in
addition to
the default topics as needed. Site stewards
can also edit an existing topic's
title
or delete an existing topic,
including default topics.
Add a new topic in the Discussion Threads
dashlet:
-
Click the (+) New Topic link in the top of
the
Discussion
Threads
dashlet. Type a new title in the Title text box and
add any desired text or tags. Click [Save]
when
finished.
The new topic
will now appear in the Discussion Threads
dashlet.
Edit an existing topic's title:
-
Click on the topic title (e.g., Value Set Usage) in the
Discussion
Threads dashlet.
-
Click on the Edit link to the right of
the topic.
-
Remove the old topic title from the Title text box and
replace it with a
new
topic
title. Click the [Save] button
when finished.
Delete a current topic in the Discussion
Threads
dashlet:
-
Click on the topic title (e.g., Value Set Usage) in the
Discussion
Threads
dashlet.
Click the (X) Delete link to the
right of the topic, and then confirm [Yes]
or
[Cancel]
in the subsequent popup.
Please be aware that if you delete a topic you will lose
all of the
content located
within that topic thread. If you decide to
delete a topic please communicate this decision to your
fellow
collaborators prior
to removing the topic from the Discussion Threads
dashlet.
For more information, see the
Alfresco
Documentation: The discussion forum.
You can control whether or not you receive VSAC
Collaboration
notifications
by email. To
review or change your notification settings:
-
Click on your name in the top black bar of VSAC
Collaboration.
-
Select My Profile to access your
User
Profile
Page.
-
Select Notifications in the features
bar at the
top.
-
If you wish to receive VSAC Collaboration notifications
by email,
check
the
Email Notification Feed checkbox and
then
click the [OK] button. If you do not
wish to
receive
email
notifications you will want to make sure the Email
Notification Feed checkbox is not checked and then click
the [OK]
button.
You can also enable and disable the notifications for
specific sites. To
review or change
your notification settings for specific sites:
-
From the User Profile Page, select
Sites in the
features bar at the top.
-
A list of all your collaboration sites will be
displayed. You can
enable
or disable the
notifications for a specific site by clicking
on the [Enable Activity Feeds] or
[Disable
Activity
Feeds] button on the far right of the site.
For more information, see the
Alfresco
Documentation: Controlling your email notifications.
The VSAC Collaboration Tool has multiple features that
will help you
manage site content.
These features include the ability to easily
move
files and
folders
within the current
site,
rename
content,
tag content,
and
create
favorites.
Move Content
within a
Collaboration Site
The VSAC Collaboration Tool has a drag and drop
functionality that
allows you to easily move
content around the site Document Library.
Please note, when you move a folder, all of its contents
move with
it.
-
In the collaboration site Document Library, locate
the file or
folder you want to move.
Click on the thumbnail of the file or folder
and, without releasing the mouse button, drag the
content to its
new
location.
-
Release the mouse button to move the content.
Note: The target folder must be visible
before you
move
the content. The
new location can be found in the panel on the
right hand side of the Document Library.
For more information, see the
Alfresco
Documentation: Dragging and dropping content.
Rename
Content within
a
Collaboration Site
You can quickly and easily rename the content within a
collaboration
site.
- Find the file or folder you want to rename in the
site Document
Library.
-
Hover the cursor on the content name to display the
pencil
icon.
-
Click the pencil icon to enter edit mode. Change the
name of the
content and then click
the Save icon to the right of
the text field or hit [ENTER] on
your keyboard.
Click the
Cancel icon to exit editing mode
and keep
the current content name.
Note: Please do not change the filename
extension.
For more information, see the
Alfresco
Documentation: Renaming content.
Tag Content within a
Collaboration
Site
To make content easier to find you can create and manage
tags for
files
and folders in the
collaboration site document library. To add
or edit tags for files and folders:
-
Navigate to the collaboration site's document
library by
selecting
the Document
Library icon, located on the Site
Dashboard menu in the upper-right hand corner. Find
the content
(file or folder) you
want to tag.
-
Hover your cursor over the No Tags
label to
display
the pencil
tag icon. If the file already has a
tag, hover your cursor on the tag to display the
pencil tag
icon.
Click the pencil tag
icon.
-
-
Add a new tag: Type the tag
name in the
textbox and then press
ENTER on your keyboard. The
tag
name can be one or more words.
-
Edit an existing tag: Click
the tag you
wish to edit to enter
edit mode. Change the tag name and then
press
ENTER on your keyboard.
- Remove a tag: Click on the
(X) to the right of
the tag you wish to remove.
-
Click the [Save] button when you
are finished
adding, editing, or
removing a tag.
To display all content with a specific tag, click on the
desired tag
located either below
the content in the document library or in the
panel on the right hand side of the Document Library.
You can also search for content using tags as the search
term.
For more information, see the
Alfresco
Documentation: Tagging content.
Favorite
Content
within
a Collaboration Site
You can use the Favorite action to mark
library
content
that you access
often. This will add the content to your
My Favorites tab in the sidebar located
on the
right
hand side of the page.
-
In the Document Library, locate the content you want
to mark as
a
Favorite.
-
Click on the star icon located
under the
content
information.
The star icon changes once it is clicked to let you know
that the
content has been added to
your list of favorites. Click the star icon
again to remove the content from your favorites list.
Check your
My
Favorites folder in the sidebar to see the
content
you added.
For more information, see the
Alfresco
Documentation: Favoriting content.
Collaboration Site managers can edit a member's role
and remove
a
member from the site. To
change a member's role or to remove a member
from a site, a site manager should
do the
following:
-
In a collaboration site, select the
More
icon
in the Site Dashboard
menu, located in the top-right corner. Click on
Site Members.
- Select People in the Members
component.
-
Search for the site member whose role you want
to change by
typing a full or partial
name in the search box, or leave the search box
empty to display all members.
-
Click the current role and select a new role
from the list.
See
below for a description
of member roles and permissions.
Site Member Roles and Permissions:
-
Managers have full
rights to
all
site content - what they
have created themselves and what
other site
members
have created.
-
Collaborators have
full rights
to
the site content that
they own; they have rights to edit
but not
delete
content created by other site
members.
-
Contributors have
full rights
to
the site content that they
own; they cannot edit or delete
content created
by
other site members.
-
Consumers have
view-only rights
in a
site; they cannot
create their own content.
To remove a member from your site
click the
[Remove]
button.
For more information, see the
Alfresco
Documentation:
Managing site members.
External users may wish to join your
collaboration site. If
an
external user submits a
request to join your collaboration site and your
site has a Visibility
of
Public, Moderated site
membership, the site manager(s)
will receive
an email notification. To approve or reject an
external
user's
request to join your site,
the site manager should:
-
Click on the link provided in the email.
Below is an
example
of the email notification:
-
The link will bring you to the
Pending
Requests page in VSAC
Collaboration. Access the user's request by
clicking on
the [View] button.
-
You may approve or reject the request by
clicking on the
[Approve] or
[Reject] buttons. An
automated
email will then be sent to the user
informing them of
your
decision. You may use the
comment box to provide the user with
additional
information regarding the reason for their
request being
approved or rejected
(optional). After selecting approve or
reject, the task
box will close and the task will be marked
as completed.
-
The automated email response sent to the
external user
includes your decision (approved
or rejected) and any additional information
you provided in the Comment box.
-
To review your previously completed external
user
requests,
go to your My Tasks page and
select on the Completed
link
on the left-hand side of the page. Locate
the desired
completed task and click on the
[View Workflow] button. The
Workflow Details page allows you to review
the user's
request and the decision made
(approved or rejected). You can also see any
comments you provided to the user.
From within your value set site in VSAC Collaboration, export a document to your local environment.
-
View the Excel file by clicking on the hyperlinked file name in the Value Set Site Content dashlet.
-
Click the [Download] button in the header bar of the spreadsheet view.
It is purposefully not within the scope of VSAC Collaboration to permit file uploads from your local environment to VSAC Collaboration. All value set creation and edits must take place within the VSAC Authoring Tool.
For more information, see the Alfresco Documentation: Downloading files.
The Discussion Threads dashlet provides a space where site members can post comments and reply to comments about value set content contained on that collaboration site. Each VSAC collaboration site automatically contains three default discussion topics: Value Set Usage, Value Set Purpose, and Value Set Content.
Add a new comment or reply to a comment in a current topic in the Discussion Threads dashlet:
-
In the Discussion Threads dashlet, click the title of the topic
under which
you
want to
comment.
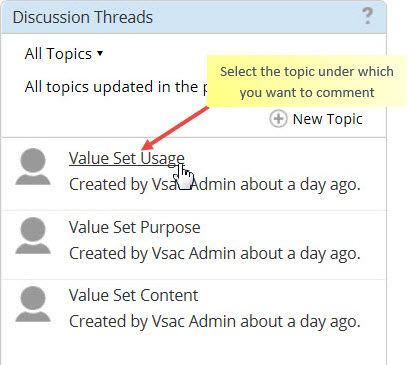
-
To add a new comment, click the Reply icon on the far right of the topic's heading page. Type your comment in the Add Reply area and then click the [Create] button at the bottom of your reply.
-
To reply to a comment, click the Reply icon
found on the
far
right of
the comments heading page. Type your reply in
the Reply to area and then click the
[Create]
button
at the bottom of your reply.
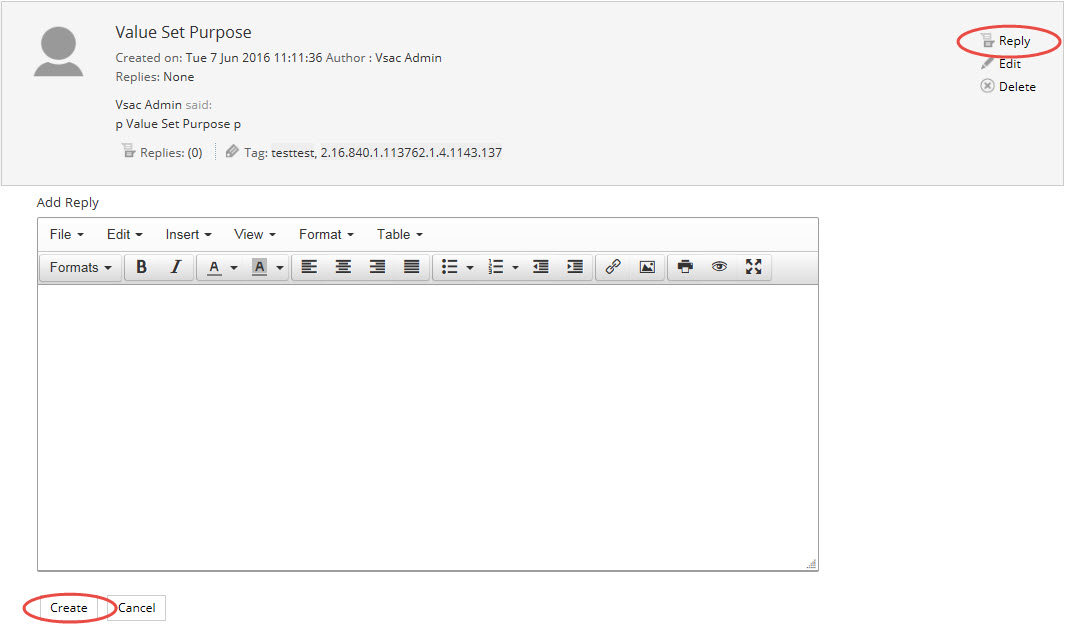
For more information, see the Alfresco Documentation: The discussion forum.
Site members can create new discussion
topics
in
addition to
the default topics as needed. Site stewards
can also edit an existing topic's
title
or delete an existing topic,
including default topics.
Add a new topic in the Discussion Threads
dashlet:
-
Click the (+) New Topic link in the top of
the
Discussion
Threads
dashlet. Type a new title in the Title text box and
add any desired text or tags. Click [Save]
when
finished.
The new topic
will now appear in the Discussion Threads
dashlet.
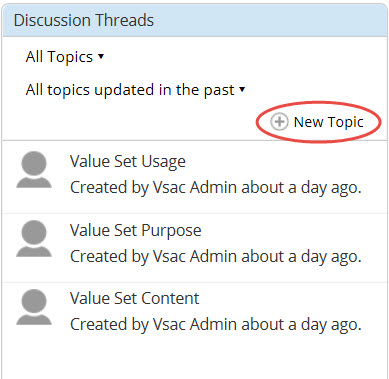
Edit an existing topic's title:
-
Click on the topic title (e.g., Value Set Usage) in the
Discussion
Threads dashlet.
-
Click on the Edit link to the right of
the topic.
-
Remove the old topic title from the Title text box and
replace it with a
new
topic
title. Click the [Save] button
when finished.
Delete a current topic in the Discussion
Threads
dashlet:
-
Click on the topic title (e.g., Value Set Usage) in the
Discussion
Threads
dashlet.
Click the (X) Delete link to the
right of the topic, and then confirm [Yes]
or
[Cancel]
in the subsequent popup.
Please be aware that if you delete a topic you will lose
all of the
content located
within that topic thread. If you decide to
delete a topic please communicate this decision to your
fellow
collaborators prior
to removing the topic from the Discussion Threads
dashlet.
For more information, see the
Alfresco
Documentation: The discussion forum.
You can control whether or not you receive VSAC
Collaboration
notifications
by email. To
review or change your notification settings:
-
Click on your name in the top black bar of VSAC
Collaboration.
-
Select My Profile to access your
User
Profile
Page.
-
Select Notifications in the features
bar at the
top.
-
If you wish to receive VSAC Collaboration notifications
by email,
check
the
Email Notification Feed checkbox and
then
click the [OK] button. If you do not
wish to
receive
email
notifications you will want to make sure the Email
Notification Feed checkbox is not checked and then click
the [OK]
button.
You can also enable and disable the notifications for
specific sites. To
review or change
your notification settings for specific sites:
-
From the User Profile Page, select
Sites in the
features bar at the top.
-
A list of all your collaboration sites will be
displayed. You can
enable
or disable the
notifications for a specific site by clicking
on the [Enable Activity Feeds] or
[Disable
Activity
Feeds] button on the far right of the site.
For more information, see the
Alfresco
Documentation: Controlling your email notifications.
The VSAC Collaboration Tool has multiple features that
will help you
manage site content.
These features include the ability to easily
move
files and
folders
within the current
site,
rename
content,
tag content,
and
create
favorites.
Move Content
within a
Collaboration Site
The VSAC Collaboration Tool has a drag and drop
functionality that
allows you to easily move
content around the site Document Library.
Please note, when you move a folder, all of its contents
move with
it.
-
In the collaboration site Document Library, locate
the file or
folder you want to move.
Click on the thumbnail of the file or folder
and, without releasing the mouse button, drag the
content to its
new
location.
-
Release the mouse button to move the content.
Note: The target folder must be visible
before you
move
the content. The
new location can be found in the panel on the
right hand side of the Document Library.
For more information, see the
Alfresco
Documentation: Dragging and dropping content.
Rename
Content within
a
Collaboration Site
You can quickly and easily rename the content within a
collaboration
site.
- Find the file or folder you want to rename in the
site Document
Library.
-
Hover the cursor on the content name to display the
pencil
icon.
-
Click the pencil icon to enter edit mode. Change the
name of the
content and then click
the Save icon to the right of
the text field or hit [ENTER] on
your keyboard.
Click the
Cancel icon to exit editing mode
and keep
the current content name.
Note: Please do not change the filename
extension.
For more information, see the
Alfresco
Documentation: Renaming content.
Tag Content within a
Collaboration
Site
To make content easier to find you can create and manage
tags for
files
and folders in the
collaboration site document library. To add
or edit tags for files and folders:
-
Navigate to the collaboration site's document
library by
selecting
the Document
Library icon, located on the Site
Dashboard menu in the upper-right hand corner. Find
the content
(file or folder) you
want to tag.
-
Hover your cursor over the No Tags
label to
display
the pencil
tag icon. If the file already has a
tag, hover your cursor on the tag to display the
pencil tag
icon.
Click the pencil tag
icon.
-
-
Add a new tag: Type the tag
name in the
textbox and then press
ENTER on your keyboard. The
tag
name can be one or more words.
-
Edit an existing tag: Click
the tag you
wish to edit to enter
edit mode. Change the tag name and then
press
ENTER on your keyboard.
- Remove a tag: Click on the
(X) to the right of
the tag you wish to remove.
-
Click the [Save] button when you
are finished
adding, editing, or
removing a tag.
To display all content with a specific tag, click on the
desired tag
located either below
the content in the document library or in the
panel on the right hand side of the Document Library.
You can also search for content using tags as the search
term.
For more information, see the
Alfresco
Documentation: Tagging content.
Favorite
Content
within
a Collaboration Site
You can use the Favorite action to mark
library
content
that you access
often. This will add the content to your
My Favorites tab in the sidebar located
on the
right
hand side of the page.
-
In the Document Library, locate the content you want
to mark as
a
Favorite.
-
Click on the star icon located
under the
content
information.
The star icon changes once it is clicked to let you know
that the
content has been added to
your list of favorites. Click the star icon
again to remove the content from your favorites list.
Check your
My
Favorites folder in the sidebar to see the
content
you added.
For more information, see the
Alfresco
Documentation: Favoriting content.
Collaboration Site managers can edit a member's role
and remove
a
member from the site. To
change a member's role or to remove a member
from a site, a site manager should
do the
following:
-
In a collaboration site, select the
More
icon
in the Site Dashboard
menu, located in the top-right corner. Click on
Site Members.
- Select People in the Members
component.
-
Search for the site member whose role you want
to change by
typing a full or partial
name in the search box, or leave the search box
empty to display all members.
-
Click the current role and select a new role
from the list.
See
below for a description
of member roles and permissions.
Site Member Roles and Permissions:
-
Managers have full
rights to
all
site content - what they
have created themselves and what
other site
members
have created.
-
Collaborators have
full rights
to
the site content that
they own; they have rights to edit
but not
delete
content created by other site
members.
-
Contributors have
full rights
to
the site content that they
own; they cannot edit or delete
content created
by
other site members.
-
Consumers have
view-only rights
in a
site; they cannot
create their own content.
To remove a member from your site
click the
[Remove]
button.
For more information, see the
Alfresco
Documentation:
Managing site members.
External users may wish to join your
collaboration site. If
an
external user submits a
request to join your collaboration site and your
site has a Visibility
of
Public, Moderated site
membership, the site manager(s)
will receive
an email notification. To approve or reject an
external
user's
request to join your site,
the site manager should:
-
Click on the link provided in the email.
Below is an
example
of the email notification:
-
The link will bring you to the
Pending
Requests page in VSAC
Collaboration. Access the user's request by
clicking on
the [View] button.
-
You may approve or reject the request by
clicking on the
[Approve] or
[Reject] buttons. An
automated
email will then be sent to the user
informing them of
your
decision. You may use the
comment box to provide the user with
additional
information regarding the reason for their
request being
approved or rejected
(optional). After selecting approve or
reject, the task
box will close and the task will be marked
as completed.
-
The automated email response sent to the
external user
includes your decision (approved
or rejected) and any additional information
you provided in the Comment box.
-
To review your previously completed external
user
requests,
go to your My Tasks page and
select on the Completed
link
on the left-hand side of the page. Locate
the desired
completed task and click on the
[View Workflow] button. The
Workflow Details page allows you to review
the user's
request and the decision made
(approved or rejected). You can also see any
comments you provided to the user.
Site members can create new discussion topics in addition to the default topics as needed. Site stewards can also edit an existing topic's title or delete an existing topic, including default topics.
Add a new topic in the Discussion Threads dashlet:
-
Click the (+) New Topic link in the top of
the
Discussion
Threads
dashlet. Type a new title in the Title text box and
add any desired text or tags. Click [Save]
when
finished.
The new topic
will now appear in the Discussion Threads
dashlet.
Edit an existing topic's title:
-
Click on the topic title (e.g., Value Set Usage) in the Discussion Threads dashlet.
-
Click on the Edit link to the right of the topic.
-
Remove the old topic title from the Title text box and
replace it with a
new
topic
title. Click the [Save] button
when finished.
Delete a current topic in the Discussion Threads dashlet:
-
Click on the topic title (e.g., Value Set Usage) in the
Discussion
Threads
dashlet.
Click the (X) Delete link to the
right of the topic, and then confirm [Yes]
or
[Cancel]
in the subsequent popup.
Please be aware that if you delete a topic you will lose all of the content located within that topic thread. If you decide to delete a topic please communicate this decision to your fellow collaborators prior to removing the topic from the Discussion Threads dashlet.
For more information, see the Alfresco Documentation: The discussion forum.
You can control whether or not you receive VSAC Collaboration notifications by email. To review or change your notification settings:
-
Click on your name in the top black bar of VSAC Collaboration.
-
Select My Profile to access your
User
Profile
Page.
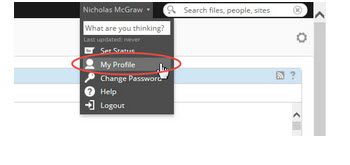
-
Select Notifications in the features bar at the top.
-
If you wish to receive VSAC Collaboration notifications
by email,
check
the
Email Notification Feed checkbox and
then
click the [OK] button. If you do not
wish to
receive
email
notifications you will want to make sure the Email
Notification Feed checkbox is not checked and then click
the [OK]
button.
You can also enable and disable the notifications for specific sites. To review or change your notification settings for specific sites:
-
From the User Profile Page, select Sites in the features bar at the top.
-
A list of all your collaboration sites will be
displayed. You can
enable
or disable the
notifications for a specific site by clicking
on the [Enable Activity Feeds] or
[Disable
Activity
Feeds] button on the far right of the site.
For more information, see the Alfresco Documentation: Controlling your email notifications.
The VSAC Collaboration Tool has multiple features that
will help you
manage site content.
These features include the ability to easily
move
files and
folders
within the current
site,
rename
content,
tag content,
and
create
favorites.
Move Content
within a
Collaboration Site
The VSAC Collaboration Tool has a drag and drop
functionality that
allows you to easily move
content around the site Document Library.
Please note, when you move a folder, all of its contents
move with
it.
-
In the collaboration site Document Library, locate
the file or
folder you want to move.
Click on the thumbnail of the file or folder
and, without releasing the mouse button, drag the
content to its
new
location.
-
Release the mouse button to move the content.
Note: The target folder must be visible
before you
move
the content. The
new location can be found in the panel on the
right hand side of the Document Library.
For more information, see the
Alfresco
Documentation: Dragging and dropping content.
Rename
Content within
a
Collaboration Site
You can quickly and easily rename the content within a
collaboration
site.
- Find the file or folder you want to rename in the
site Document
Library.
-
Hover the cursor on the content name to display the
pencil
icon.
-
Click the pencil icon to enter edit mode. Change the
name of the
content and then click
the Save icon to the right of
the text field or hit [ENTER] on
your keyboard.
Click the
Cancel icon to exit editing mode
and keep
the current content name.
Note: Please do not change the filename
extension.
For more information, see the
Alfresco
Documentation: Renaming content.
Tag Content within a
Collaboration
Site
To make content easier to find you can create and manage
tags for
files
and folders in the
collaboration site document library. To add
or edit tags for files and folders:
-
Navigate to the collaboration site's document
library by
selecting
the Document
Library icon, located on the Site
Dashboard menu in the upper-right hand corner. Find
the content
(file or folder) you
want to tag.
-
Hover your cursor over the No Tags
label to
display
the pencil
tag icon. If the file already has a
tag, hover your cursor on the tag to display the
pencil tag
icon.
Click the pencil tag
icon.
-
-
Add a new tag: Type the tag
name in the
textbox and then press
ENTER on your keyboard. The
tag
name can be one or more words.
-
Edit an existing tag: Click
the tag you
wish to edit to enter
edit mode. Change the tag name and then
press
ENTER on your keyboard.
- Remove a tag: Click on the
(X) to the right of
the tag you wish to remove.
-
Click the [Save] button when you
are finished
adding, editing, or
removing a tag.
To display all content with a specific tag, click on the
desired tag
located either below
the content in the document library or in the
panel on the right hand side of the Document Library.
You can also search for content using tags as the search
term.
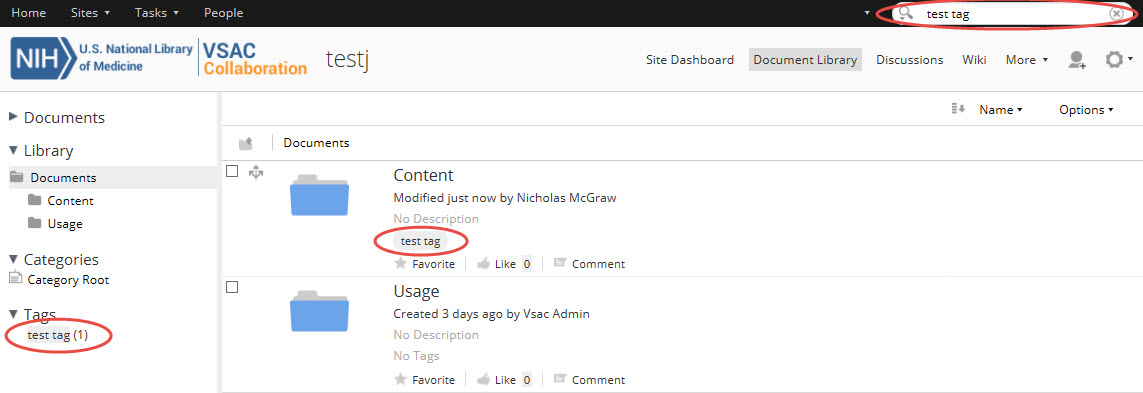
For more information, see the
Alfresco
Documentation: Tagging content.
Favorite
Content
within
a Collaboration Site
You can use the Favorite action to mark
library
content
that you access
often. This will add the content to your
My Favorites tab in the sidebar located
on the
right
hand side of the page.
-
In the Document Library, locate the content you want
to mark as
a
Favorite.
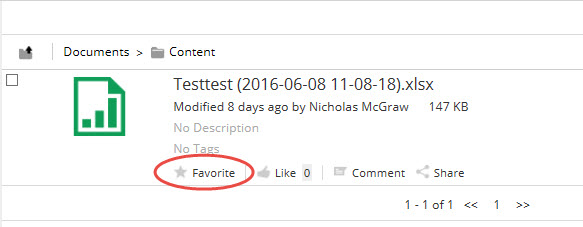
-
Click on the star icon located
under the
content
information.
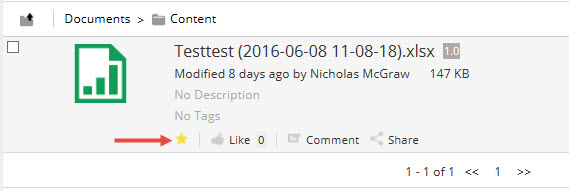
The star icon changes once it is clicked to let you know
that the
content has been added to
your list of favorites. Click the star icon
again to remove the content from your favorites list.
Check your
My
Favorites folder in the sidebar to see the
content
you added.
For more information, see the
Alfresco
Documentation: Favoriting content.
Collaboration Site managers can edit a member's role
and remove
a
member from the site. To
change a member's role or to remove a member
from a site, a site manager should
do the
following:
-
In a collaboration site, select the
More
icon
in the Site Dashboard
menu, located in the top-right corner. Click on
Site Members.
- Select People in the Members
component.
-
Search for the site member whose role you want
to change by
typing a full or partial
name in the search box, or leave the search box
empty to display all members.
-
Click the current role and select a new role
from the list.
See
below for a description
of member roles and permissions.
Site Member Roles and Permissions:
-
Managers have full
rights to
all
site content - what they
have created themselves and what
other site
members
have created.
-
Collaborators have
full rights
to
the site content that
they own; they have rights to edit
but not
delete
content created by other site
members.
-
Contributors have
full rights
to
the site content that they
own; they cannot edit or delete
content created
by
other site members.
-
Consumers have
view-only rights
in a
site; they cannot
create their own content.
To remove a member from your site
click the
[Remove]
button.
For more information, see the
Alfresco
Documentation:
Managing site members.
External users may wish to join your
collaboration site. If
an
external user submits a
request to join your collaboration site and your
site has a Visibility
of
Public, Moderated site
membership, the site manager(s)
will receive
an email notification. To approve or reject an
external
user's
request to join your site,
the site manager should:
-
Click on the link provided in the email.
Below is an
example
of the email notification:
-
The link will bring you to the
Pending
Requests page in VSAC
Collaboration. Access the user's request by
clicking on
the [View] button.
-
You may approve or reject the request by
clicking on the
[Approve] or
[Reject] buttons. An
automated
email will then be sent to the user
informing them of
your
decision. You may use the
comment box to provide the user with
additional
information regarding the reason for their
request being
approved or rejected
(optional). After selecting approve or
reject, the task
box will close and the task will be marked
as completed.
-
The automated email response sent to the
external user
includes your decision (approved
or rejected) and any additional information
you provided in the Comment box.
-
To review your previously completed external
user
requests,
go to your My Tasks page and
select on the Completed
link
on the left-hand side of the page. Locate
the desired
completed task and click on the
[View Workflow] button. The
Workflow Details page allows you to review
the user's
request and the decision made
(approved or rejected). You can also see any
comments you provided to the user.
The VSAC Collaboration Tool has multiple features that will help you manage site content. These features include the ability to easily move files and folders within the current site, rename content, tag content, and create favorites.
Move Content within a Collaboration Site
The VSAC Collaboration Tool has a drag and drop functionality that allows you to easily move content around the site Document Library. Please note, when you move a folder, all of its contents move with it.
-
In the collaboration site Document Library, locate
the file or
folder you want to move.
Click on the thumbnail of the file or folder
and, without releasing the mouse button, drag the
content to its
new
location.
-
Release the mouse button to move the content.
Note: The target folder must be visible before you move the content. The new location can be found in the panel on the right hand side of the Document Library.
For more information, see the Alfresco Documentation: Dragging and dropping content.
Rename Content within a Collaboration Site
You can quickly and easily rename the content within a collaboration site.
- Find the file or folder you want to rename in the site Document Library.
-
Hover the cursor on the content name to display the
pencil
icon.
-
Click the pencil icon to enter edit mode. Change the
name of the
content and then click
the Save icon to the right of
the text field or hit [ENTER] on
your keyboard.
Click the
Cancel icon to exit editing mode
and keep
the current content name.
Note: Please do not change the filename extension.
For more information, see the Alfresco Documentation: Renaming content.
Tag Content within a Collaboration Site
To make content easier to find you can create and manage tags for files and folders in the collaboration site document library. To add or edit tags for files and folders:
-
Navigate to the collaboration site's document
library by
selecting
the Document
Library icon, located on the Site
Dashboard menu in the upper-right hand corner. Find
the content
(file or folder) you
want to tag.
-
Hover your cursor over the No Tags
label to
display
the pencil
tag icon. If the file already has a
tag, hover your cursor on the tag to display the
pencil tag
icon.
Click the pencil tag
icon.
-
- Add a new tag: Type the tag name in the textbox and then press ENTER on your keyboard. The tag name can be one or more words.
- Edit an existing tag: Click the tag you wish to edit to enter edit mode. Change the tag name and then press ENTER on your keyboard.
- Remove a tag: Click on the (X) to the right of the tag you wish to remove.
-
Click the [Save] button when you
are finished
adding, editing, or
removing a tag.
To display all content with a specific tag, click on the desired tag located either below the content in the document library or in the panel on the right hand side of the Document Library.
You can also search for content using tags as the search term.
For more information, see the Alfresco Documentation: Tagging content.
Favorite Content within a Collaboration Site
You can use the Favorite action to mark library content that you access often. This will add the content to your My Favorites tab in the sidebar located on the right hand side of the page.
-
In the Document Library, locate the content you want
to mark as
a
Favorite.
-
Click on the star icon located
under the
content
information.
The star icon changes once it is clicked to let you know that the content has been added to your list of favorites. Click the star icon again to remove the content from your favorites list. Check your My Favorites folder in the sidebar to see the content you added.
For more information, see the Alfresco Documentation: Favoriting content.
Collaboration Site managers can edit a member's role and remove a member from the site. To change a member's role or to remove a member from a site, a site manager should do the following:
-
In a collaboration site, select the
More
icon
in the Site Dashboard
menu, located in the top-right corner. Click on
Site Members.
- Select People in the Members component.
- Search for the site member whose role you want to change by typing a full or partial name in the search box, or leave the search box empty to display all members.
-
Click the current role and select a new role
from the list.
See
below for a description
of member roles and permissions.
Site Member Roles and Permissions:
-
Managers have full rights to all site content - what they have created themselves and what other site members have created.
-
Collaborators have full rights to the site content that they own; they have rights to edit but not delete content created by other site members.
-
Contributors have full rights to the site content that they own; they cannot edit or delete content created by other site members.
-
Consumers have view-only rights in a site; they cannot create their own content.
-
To remove a member from your site click the [Remove] button.
For more information, see the Alfresco Documentation: Managing site members.
External users may wish to join your
collaboration site. If
an
external user submits a
request to join your collaboration site and your
site has a Visibility
of
Public, Moderated site
membership, the site manager(s)
will receive
an email notification. To approve or reject an
external
user's
request to join your site,
the site manager should:
-
Click on the link provided in the email.
Below is an
example
of the email notification:
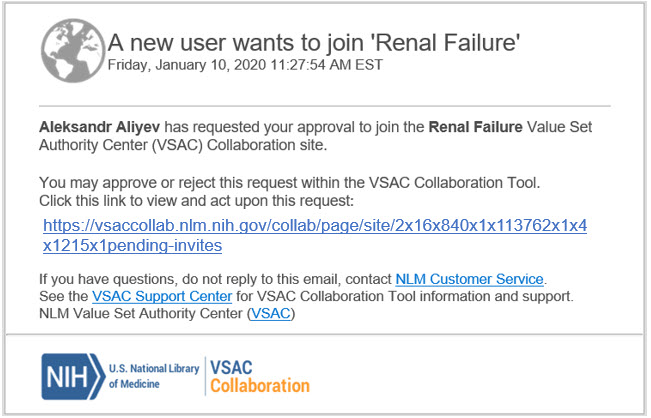
-
The link will bring you to the
Pending
Requests page in VSAC
Collaboration. Access the user's request by
clicking on
the [View] button.
-
You may approve or reject the request by
clicking on the
[Approve] or
[Reject] buttons. An
automated
email will then be sent to the user
informing them of
your
decision. You may use the
comment box to provide the user with
additional
information regarding the reason for their
request being
approved or rejected
(optional). After selecting approve or
reject, the task
box will close and the task will be marked
as completed.
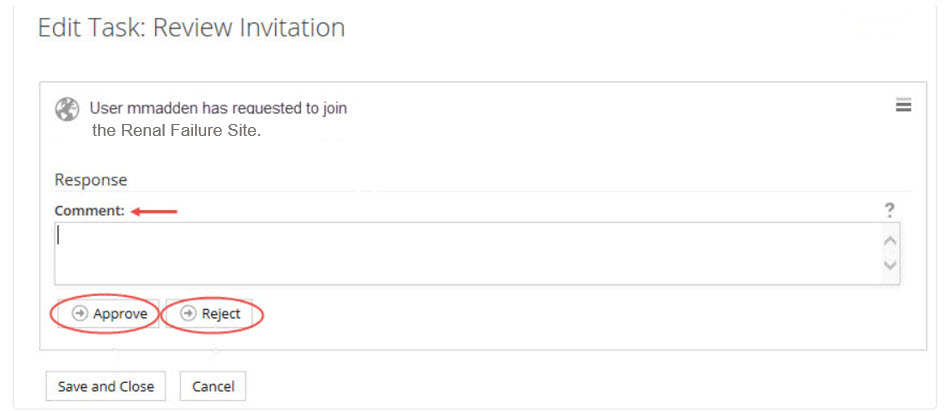
-
The automated email response sent to the
external user
includes your decision (approved
or rejected) and any additional information
you provided in the Comment box.
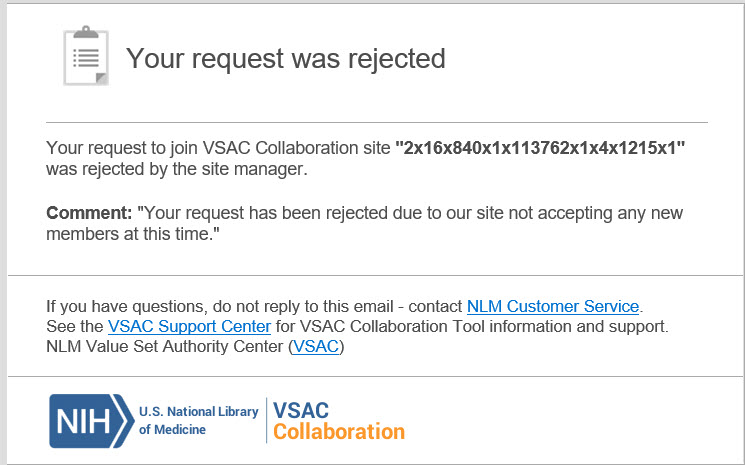
-
To review your previously completed external
user
requests,
go to your My Tasks page and
select on the Completed
link
on the left-hand side of the page. Locate
the desired
completed task and click on the
[View Workflow] button. The
Workflow Details page allows you to review
the user's
request and the decision made
(approved or rejected). You can also see any
comments you provided to the user.
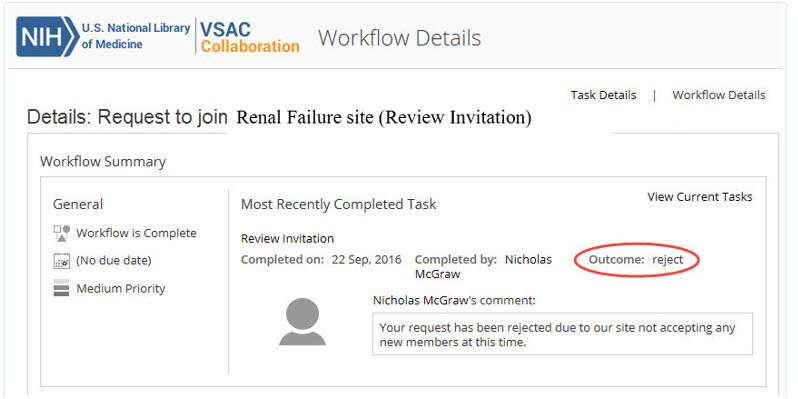
External users may wish to join your collaboration site. If an external user submits a request to join your collaboration site and your site has a Visibility of Public, Moderated site membership, the site manager(s) will receive an email notification. To approve or reject an external user's request to join your site, the site manager should:
-
Click on the link provided in the email.
Below is an
example
of the email notification:
-
The link will bring you to the
Pending
Requests page in VSAC
Collaboration. Access the user's request by
clicking on
the [View] button.
-
You may approve or reject the request by
clicking on the
[Approve] or
[Reject] buttons. An
automated
email will then be sent to the user
informing them of
your
decision. You may use the
comment box to provide the user with
additional
information regarding the reason for their
request being
approved or rejected
(optional). After selecting approve or
reject, the task
box will close and the task will be marked
as completed.
-
The automated email response sent to the
external user
includes your decision (approved
or rejected) and any additional information
you provided in the Comment box.
- To review your previously completed external user requests, go to your My Tasks page and select on the Completed link on the left-hand side of the page. Locate the desired completed task and click on the [View Workflow] button. The Workflow Details page allows you to review the user's request and the decision made (approved or rejected). You can also see any comments you provided to the user.
Last Reviewed: May 26, 2022